Last updated Mar 27, 2026
One-of-a-Kind Feature Improves Operator Safety
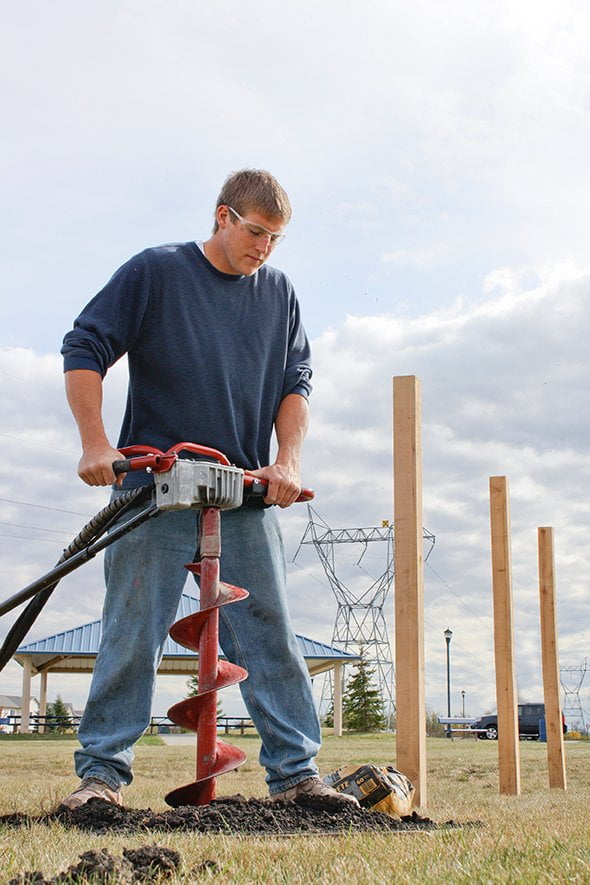
In the mid-1970s, Van Cox set out to solve one of earth drilling’s most punishing problems — auger torque. Cox, an engineer for Little Beaver, soon completed a design and secured a patent for what is now known as the torque tube. The one-of-a-kind invention protects operators from the harmful effects of a drill’s torque by transferring kickback from the auger to the power source.
More than 40 years later, deck builders, fence contractors, landscapers and rental customers continue to enjoy torque-free drilling as well as the labor-saving benefits made possible by safe, one-person drilling.
The invention remains a defining feature on Little Beaver’s of mechanical and hydraulic earth drills, and it continues to make life easier for business owners and drill operators thanks to the many benefits of torque-free drilling.
Less Manpower: By transferring dangerous kickback to the engine carriage as opposed to the handles, one person can safely operate a Little Beaver drill. Most drills without torque protection require two operators for safe use. One-person drilling frees up the second individual to work on other tasks so jobs are completed in less time.
Fewer Strains: Kickback on traditional drills can jar an operator’s body, causing strains and injuries, which lead to time off and worker’s compensation costs. Even minor injuries, ones that don’t result in time away from work, can slow individuals down, decreasing overall production.
Easier Use: Since the torque tube absorbs kickback, operators don’t need to work as hard to control the machine. This significantly reduces fatigue while allowing operators of any age or experience level to easily handle the drill.
If you’re still not convinced of the benefits of Van Cox’s invention, see Little Beaver’s solutions for yourself.
Last updated Mar 27, 2026
Learn the proper setup procedure for your Big Beaver Earth Drill from Little Beaver Inc. The Big Beaver is just 26 inches wide, which makes it easy to maneuver into backyards and onto jobsites that are inaccessible to larger equipment or trailer-mounted rigs.
Last updated Mar 27, 2026
Tips For Preventing and Diagnosing Mechanical Earth Drills Issues
Mechanical drills’ high operating speeds and compact sizes make them a popular choice for contractors and rental centers — and ideal for drilling holes quickly. Although these transmission-powered machines have significantly more moving parts than their more costly hydraulic counterparts, simple knowledge of how to prevent and diagnose common problems will keep your drill running efficiently. Below are answers to questions we get often and some tips to help you achieve better ROI.
What steps can I take to minimize the risk of damaging the drill?
Start by choosing a unit with the correct gear ratio and auger for your soil. For soil with minimal rocks and few roots, a 10:1 gear ratio with a standard auger will provide fast and efficient results. For drilling in clay or other difficult conditions, a 10:1 gear ratio will still work, but switch from a standard to carbide blade to effectively cut through the soil. If you’re working in an area with rocks exceeding 3 inches in diameter, choose a drill with a 20:1 gear ratio reduction and a heavy-duty auger. The gear reduction slows the auger from 360 to 180 rpm and will pop the rocks out of the soil and continue spinning.
Should I be concerned that the gearbox is hot or making an unusual sound?
The gearbox will always be hot to the touch when the drill is operating. However, if the transmission is extremely hot, smells like burned oil or starts making unusual sounds, check the oil level. Oil leaks can occur around the seal, lower output shaft or the top of the transmission, and will lead to drill damage if ignored. Low oil also increases the risk of premature bearing wear, which can result in excessive heat and unusual sounds. To prevent early wear, check the transmission oil level and condition monthly or every 40 hours of operation.
The engine is running, so why won’t the auger turn?
A problem with the drivetrain, most likely along the flexible drive shaft, is to blame. To pinpoint the issue, start by inspecting the end fittings for cracks or breaks. If there are broken wires or sharp kinks, it’s time to replace the shaft housing. If things appear fine from the outside, remove the flex shaft for further inspection. To prevent flex shaft damage, clean, examine and grease the flex shaft every 50 hours of operation. Check your owner’s manual to determine the correct procedure for greasing the flex shaft.
Why does the clutch slip or cause the drill to jerk during operation?
Over time, a drill’s clutch padding wears, resulting in reduced performance when engaging the auger or accelerating the engine from idle to full speed. The clutch will continue to run, even if the padding is completely gone, leading to easily detectable problems. It’s best to inspect the clutch every 30 days or any time you lubricate the flexible drive shaft. Regular checks will help you track the wear so you can replace the clutch pads before the drill loses performance.
Why is the drill less efficient than it used to be despite everything working properly?
Too often, operators allow the points and blades to wear beyond the point of being effective. The drill can run perfectly and spin all day, but if the blades and points are worn, the unit will become less and less effective.
Where can I find additional resources?
Information is always available at your fingertips, including comprehensive maintenance brochures and video tutorials. These helpful tools are excellent resources and often include visuals as well as step-by-step instructions.
Knowing your drill, keeping up with maintenance and accessing additional resources when questions arise will go a long way toward successful drilling.
Last updated Mar 27, 2026
4 Tips for Building the Perfect Fence
You’ve become an expert in landscaping throughout the region. From planting trees and flowers to installing decks and curb edging, you’ve completed many projects for satisfied customers. Now it’s time to step up your game and add fence installation to your services.
Let these fence-building tips lead you to success.
1. Get Answers.
Start like you would with any project, by working with the homeowner or business owner to establish the size, scope and specifics of the project. To do this, always have a set of questions ready that will get to the heart of the project. What kind of fence does the customer want? What will the layout be? Where do they want gates? How high should you build it?
Check with city building codes and, if applicable, neighborhood association rules, so that the fence specs meet all of the codes. If the city assessor has not surveyed the property recently, you’ll want to coordinate that to ensure the fence is built in the proper location and, depending on the area, you may need a permit. Call 811 a few days prior to digging to have utility companies mark underground utility lines, gas pipes and sprinkler systems.
2. Get Your Tools.
Selecting the right hole digging equipment will help you finish on time and on budget. If it’s a small project, you might use a hand-held posthole digger. If you’re doing more than a dozen holes, though, it will be slow work to muscle each hole clean. To tackle bigger or multiple projects, you’ll want the speed and ease-of-use that comes with an earth drill. A Little Beaver mechanical one-man or hydraulic drill can bore each hole in less than a minute with little effort. It’s equally important is to make sure you select the correct auger, points and blades for the soil type you’re working in. This will help you dig holes faster with less pain.
3. Get it Straight.
You can’t get a straight fence without evenly spaced holes and firmly set posts. Set the spacing by marking and digging all corner and gate post holes first. Run a string from corner to corner and then measure the post spacing along the line.
For chain link fences, space postholes no more than 10 feet apart. For wooden fences, posts usually stand 6 to 8 feet apart. If installing posts in soft soils or windy areas, use a hand posthole digger to flare out the hole, creating a bell shape for more stability. The hole diameter needed is based on the size of the post used. For instance, a 4-by-4 post requires an 8-inch diameter hole. This can be easily achieved with Little Beaver’s snap-on augers that range in diameter from 1.5 to 16 inches. Holes are typically 24 inches deep, but you’ll need to ensure the depth is 3 inches below the frost line to prevent posts from cracking in the frozen ground. In some parts of the northern U.S. and into Canada, that means going as deep as 4 feet. If you’re in windy areas or sandy soil, you may want to dig your posts even deeper.
4. Get the Concrete.
Position the posts so that they are the correct height and plumb; even the slightest lean can create a slanted and potentially unstable fence. Next, shovel concrete into each hole. Avoid touching the post, which could cause it to move. Choosing concrete rather than a dirt and gravel mix will give the fence better stability. Allow 24 hours for the concrete to set, and then attach the chain link fabric or wood framing and face boards. With both types of fences, complete the gates last.
Once you’re done, it’s an ideal time to touch base with your customer on fence maintenance and landscaping recommendations. A job well done here can translate to more work, whether from this customer or referrals, as you continue to expand your landscaping services.
Feel free to contact us for further fence-building tips; or general questions on our full line of augers, one-man earth drills and two-man earth drills. We’re always happy to provide the tools and assistance you need.
Last updated Mar 27, 2026
How Our Auger Blades and Points Slash Maintenance Costs and Reduce Downtime
High-maintenance machines can be a real headache when you want to maximize uptime. That’s why it’s important to have the right equipment well-suited for whatever task and sediment you’re working with. Matching the ideal point and blade to the specific soil type minimizes premature wear, maintenance costs and labor. Unlike manufacturers that only make one auger blade, Little Beaver produces a variety of augers, points and blades. The components are designed for optimizing your ability to cut through a variety of soil profiles.
Our replaceable blades and points mount on our regular and heavy-duty snap-on augers with ease. They protect the earth augers from wear while drilling in material that ranges from loamy soil to compacted rock. Since drilling a bunch of holes in the ground can be time consuming, here are a few ways we make it easier.
Ease of Use, Low Maintenance
“We want to keep our customers drilling without interruption,” said Little Beaver President Joe Haynes. “We designed our blades and points for simple replacement on our signature snap-on augers so operators can focus on digging and quickly change out parts when they become dull or worn.”
The standard blades and points come with every Little Beaver snap-on auger. They fasten to the auger with two steel bolts, which operators can easily remove with a crescent wrench. Made with abrasive-resistant steel and hard surfacing on their edges, these components are ideally suited for loamy soils with few rocks.
Equipped with Little Beaver blades and points, an auger can drill more than 100 holes in prime soil conditions before you need to service it. Our parts are easy to use and require low levels of maintenance — benefits that remain unmatched across the industry.
Rugged and Versatile
Smaller-diameter augers — 1-1/2-inch, 2-inch and 3-inch — use standard points that simply screw or pin on. For dense soils, we offer Little Beaver exclusive carbide blades that fasten to the bottom of snap-on augers. They cut hard clay and frozen ground into smaller pieces.
“Many operators keep both the standard and carbide blades on hand if they will be transitioning between multiple jobsites. It’s quick and easy to make the swap,” Haynes said. “Having both sets enables digging in a diversity of soil conditions. It also prolongs the lifespan of blades and augers.”
To take on the most challenging soil formations, Little Beaver’s lineup of heavy-duty snap-on augers use specially engineered, heavy-duty steel and carbide blades and tips for abrasive soils and compacted rock. They lock into larger-diameter augers with rubber locks, forming a tight wedge fit to cut through tough sediment without coming loose.
Let’s Make It Happen
Little Beaver’s commitment to innovation and versatility for customers makes its augers, blades and points a reliable choice for professionals in the field, enhancing drilling efficiency while reducing overall operational costs. We would love to collaborate on maximizing the value of your earth drilling operation. To learn more, give us a call at 936-327-3121 or fill out our online contact form and a member of our team will be in touch with you soon.