
Last updated Mar 27, 2026
Factors to Consider When Addressing Wear Issues
Nothing ruins productivity like a broken piece of equipment. While that statement may seem fairly obvious, the actions to address problems are not always clear cut. Depending on the severity of the issue, you may be able to get away with a quick fix or repair to extend the life of the machine. But for larger issues, a full replacement might make more sense.
This logic holds true with earth drills just as much as any other piece of equipment in your fleet. There are many working parts to a drill, and while issues aren’t a common occurrence, they certainly can happen. Unfortunately, there is not a guide or rule book to tell you exactly when to repair and when to replace your earth drill. But with a bit of guidance and the help of an expert manufacturer, your decision may be a little easier.
Here are some factors to consider when repairing or replacing your earth drill:
What seems to be the issue?
Some of the most common earth drill issues include an auger that quits turning or turns when it’s not supposed to. If your auger spins while it’s out of the ground but quits spinning as soon as you start to drill the hole, it’s likely a broken flex shaft. The flex shaft should be cleaned and greased after every 50 hours of operation, but sometimes even routine maintenance can’t prevent breakage. A broken flex shaft can’t be repaired, and usually costs about $600 for the part and up to $100 for installation. In some cases, just replacing the inner core will fix the problem for around $200.
Gearbox issues are a different story. An issue with the gears or the gearbox prevents the drill from spinning altogether. While low motor oil can cause the motor to lock up and cease functioning, there’s also the possibility of a larger issue, such as the gears being stripped. Gearboxes can be repaired, but can cost nearly as much as a full replacement – a comparison of about $725 to repair or $850 plus installation costs to replace.
If the auger spins at idle, the diagnosis is likely the clutch. The auger shouldn’t spin until you depress the throttle and engage the clutch. If the clutch is overheated during operation, the heat-treated springs will no longer keep the shoes from engaging, causing the auger to stay engaged at all times. Similar to the gearbox, the repair cost nears the full replacement cost – a comparison of about $140 and $160 plus installation costs for a new clutch.
If the auger vibrates excessively or “walks” during use, it is likely due to misalignment or wear of the points and blades. Blades should be replaced when worn flush of the auger flighting. If the blades wear into the auger flighting, the auger will need to be repaired or replaced. Points should be replaced when the split or fork in the tip is less than ¼” from the bottom of the split.
What would a replacement part cost?
The cost of parts varies among manufacturers. A general statement of advice is that if the replacement parts cost more than 50% of a new drill, it might be best to invest in a new unit. Keep in mind though, don’t just look at the sticker price. You should also include the labor and cost of lost production, as well as the age of the equipment.
Common replacement parts like the flex shaft and the gearbox can add up to a significant dollar amount. In fact, if both need to be repaired at the same time, it can cost almost 50% of a new drill. While it’s not common for these two parts to break at the same time, it can happen if an operator hits an obstacle while digging at a fast speed.
If two or more parts need to be replaced at the same time, you may be better off replacing the entire drill. However, making the repairs and rebuilds yourself can be a more financially feasible option for those with the experience and tools to do so.
Can you fix it yourself?
Hiring someone to fix your equipment is often a logical choice, as it alleviates the effort required on your part. However, when you take this route, it’s important to factor in repair costs and time that is outside of your control.
The alternative – fixing it yourself – doesn’t have to seem like a daunting undertaking. Many manufacturers have resources to walk you through the process. Little Beaver offers service videos that address common repairs and maintenance questions. It might seem tempting to pay someone to fix your drill, but educating yourself on the components and repair process can save you time and money in the long run. If someone on your staff is mechanically inclined, they should be able to tackle the repairs.
In what application do you use the drill?
If you’ve got backup drills in your fleet, waiting for a repair might not be an issue. But for contractors who rely on the unit on a daily or even weekly basis, being without it could result in lost revenue. In the summer, especially, many local lawn and garden repair shops are backed up for 6-12 weeks, which is not a feasible wait time for many people. Depending on how long you’ve owned the machine and what industry you’re in, the decision to repair or replace might make more sense.
Rental
In the rental industry, only drills that operate bring in revenue. So if repairing a drill would take time, replacing it might be a better option. If time is the greatest concern, consider purchasing a second unit as a back-up and additional revenue source until the original drill is fixed.
In the rental industry, appearance of equipment is a large deciding factor for customers. Replacing a worn-out drill with a shiny new one might make more sense for the fleet. If turning inventory is on an annual or 18-month requirement, the chances are low that something would go wrong and require a full replacement before that time. In other instances, a rental center might repair a drill for 20 years. The criteria is different for each business, so make sure the cost and the results make sense for your store.
Fencing
In the fencing industry, it’s important to have a large enough fleet to change out drills if one needs repairs. Fencing contractors likely have more than one drill in their lineup, so taking one out of commission to get it repaired shouldn’t affect productivity. For many contractors, incremental costs broken up monthly are a more feasible option than a single, larger payment. But, it’s important to consider the cost of each of those repairs. Consider the overall age of the drill and how many key components could be showing that age.
What is the age and condition of the drill?
If a drill is maintained well and taken care of, it should last many years. There’s no rule that says “after 10 years or 10,000 hours of use, the motor will go out,” so it’s important to keep an eye on the machine. If a drill is rented out and used for 20 hours a week, it would likely require less maintenance than a fencing contractor who uses the drill 40 hours a week.
When considering repairing or replacing your drill, you’ll want to consider the overall health of the engine. If the engine is older and experiencing issues, replacement might be more logical however, if the engine is a rebuilt system and virtually like new, repair makes more sense.
Making a decision
If you suspect something is wrong with your drill, address it right away. If issues aren’t fixed in a timely manner, they can have a domino effect and create more damage. Taking care of one component right away can save time and hassle and prevent other issues.
Also, it’s important to remember that if you decide to purchase a brand-new drill, keep your old one on hand for replacement parts. Over time, it might be a good idea to fix up the old drill to use as a backup, too.
It’s hard to provide a cut-and-dry guide to repairing or replacing your equipment. The manufacturer can likely provide advice on your particular situation, so give them a call if you need help with the decision. Addressing problems and repairing or replacing your earth drill will help bring your operation back to maximum productivity.
Last updated Mar 27, 2026
Keeping Safety in Mind Before Starting the Job
Whether you’re using a hand shovel or an excavator, an earth drill or a trencher, a hole is a hole and there are several safety precautions that come along with a digging project. Sharp tools present the opportunity for dangerous situations, let alone combined with the power of a mechanical or hydraulic rig. Choosing a safe machine, calling before you dig and operating the machine according to manufacturer recommendations are all things to consider before starting. Keeping safety in mind before starting any job is crucial to avoiding injuries, some of which can be serious.
Select a Safe Drill
Choosing a drill with safety-enhancing features can make or break a project. No matter what kind of drill you’re looking for – mechanical or hydraulic, a larger rig or smaller piece of equipment – there are certain features to look for to ensure the safest operation.
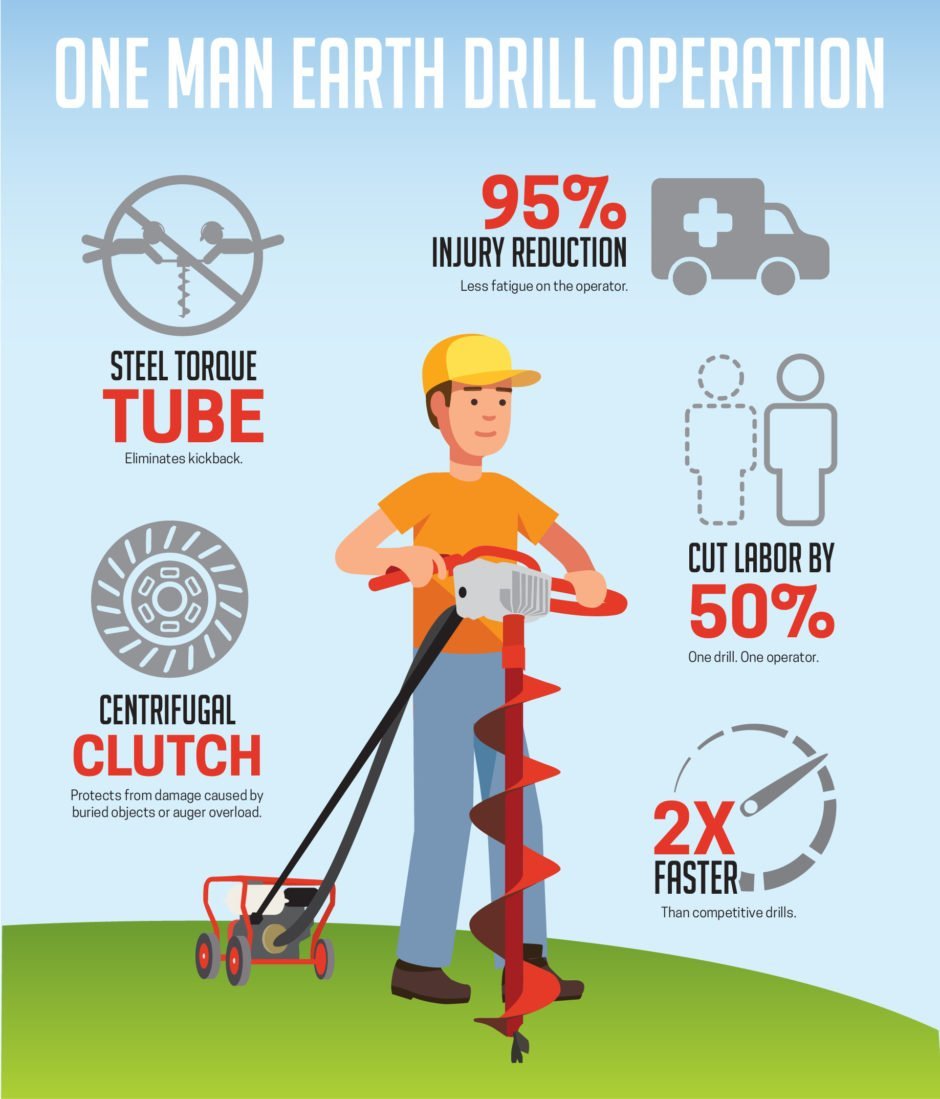
First, make sure the drill has a torque bar. This addition protects operators from the harmful effects of a drill’s torque by transferring kickback from the auger to the power source. By distributing force to the engine carriage as opposed to the handles, one person can safely and comfortably operate these drills. In addition to protecting the operator from harm, torque tubes reduce operator effort and fatigue.
Torque tubes are the only way to ensure safe operation of a one-man drill. The torque tube eliminates the kickback common with competitive earth augers, making one-man drilling safe, fast and productive. Many two-man drills exist, but if they’re not operated correctly, they present a handful of potential issues. If one operator slips or lets go, the other operator risks being thrown and injured. A one-man earth drill is designed to be a safe and efficient piece of equipment.
Additionally, mechanical drills are often equipped with a centrifugal clutch. If the auger encounters an object beneath the surface or if it’s overloaded, the clutch automatically slips to protect the operator from serious injury.
Call Before You Start
 Calling before you dig can be the difference between smooth sailing and a potential disaster. There are millions of miles of buried utilities below the surface, including gas lines, underground sprinklers, sewer pipes and more. Buried gas or power lines are the most dangerous, with the potential for electrocution, fire, severe burns or even fatalities. Always call the national diggers hotline at 811 at least 48 hours prior to digging to have underground utilities marked. When the inspector arrives, pay attention to the details since state laws differ when it comes to how long your permits are valid and what the paint or flags indicate. There may be multiple utility lines to be aware of.
Besides underground utilities, you should have a general idea of what lies below. Fill material, wood, rocks and more can be hiding underground. Take a good survey of your site beforehand. Not only does this provide another level of safety, but it helps you make a decision on which kind of drill bit to select.
Operate Safely
After you’ve equipped yourself with the safest drill and underground utilities have been marked, it’s time to start your project. If you’ve chosen a one-man drill, it’s important to operate the drill alone, as the handles are designed for a solo operation. Bystanders should be at least 10 feet away, and everyone should be wearing hard hats and safety goggles.
Avoid loose-fitting clothing, including gloves. If work gloves are too loose, they can hinder your ability to appropriately operate the drill. Wear work boots or quality athletic shoes, avoiding hanging shoelaces that could get caught in the auger.
Once the auger is running, position it perpendicular to the ground for the best possible control and optimal results. Touch the auger to the ground before you start rotating. For the best control, adjust the downward pressure based on the soil conditions. If the soil is soft, ease up slightly. If the ground is harder, apply a little more pressure, but not so much that rotation slows or stops.
Once you’ve reached the desired depth, there’s a proper procedure for safely removing the auger from the ground. Release the throttle control and allow the auger to come to a complete stop. Once the auger has stopped turning, it can safely be removed from the hole. Hydraulic rigs feature a forward/reverse lever to make it easier to lift the dirt out. This allows the operator to ease the drill out of the ground as opposed to tugging heavily on the equipment, greatly minimizing the physical effort required to get the job done.
By following a few easy steps, you can ensure your drilling operation is safe, efficient and injury-free.
Last updated Mar 27, 2026
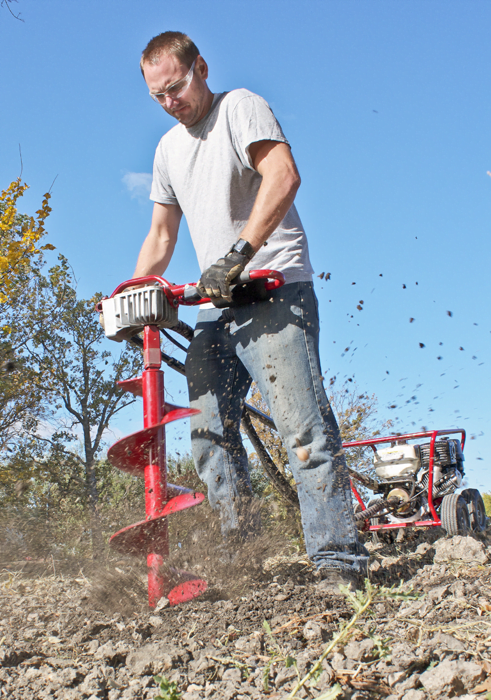
Little Beaver Earth Drills are designed to be safely operated by just one person. What does that mean for your business? More efficient labor utilization. Faster job completion. Fewer injuries. More profit on every job.
Check out the infographic below to learn how Little Beaver Earth Drills can double your productivity and maximize jobsite safety.

Last updated Mar 27, 2026
One-of-a-Kind Feature Improves Operator Safety
In the mid-1970s, Van Cox set out to solve one of earth drilling’s most punishing problems — auger torque. Cox, an engineer for Little Beaver, soon completed a design and secured a patent for what is now known as the torque tube. The one-of-a-kind invention protects operators from the harmful effects of a drill’s torque by transferring kickback from the auger to the power source.
More than 40 years later, deck builders, fence contractors, landscapers and rental customers continue to enjoy torque-free drilling as well as the labor-saving benefits made possible by safe, one-person drilling.
The invention remains a defining feature on Little Beaver’s of mechanical and hydraulic earth drills, and it continues to make life easier for business owners and drill operators thanks to the many benefits of torque-free drilling.
Less Manpower: By transferring dangerous kickback to the engine carriage as opposed to the handles, one person can safely operate a Little Beaver drill. Most drills without torque protection require two operators for safe use. One-person drilling frees up the second individual to work on other tasks so jobs are completed in less time.
Fewer Strains: Kickback on traditional drills can jar an operator’s body, causing strains and injuries, which lead to time off and worker’s compensation costs. Even minor injuries, ones that don’t result in time away from work, can slow individuals down, decreasing overall production.
Easier Use: Since the torque tube absorbs kickback, operators don’t need to work as hard to control the machine. This significantly reduces fatigue while allowing operators of any age or experience level to easily handle the drill.
If you’re still not convinced of the benefits of Van Cox’s invention, see Little Beaver’s solutions for yourself.

Last updated Mar 27, 2026
Reduce the Risk of Strains and Injuries
Lifting and handling 100 pounds can be a difficult task, even for the youngest and fittest individuals. Sprains, strains and tears are the leading injuries among all jobs, reports the U.S. Bureau of Labor Statistics.
Drilling can be done with less risk of strains and injuries when the equipment used has been designed to lessen the toll on workers’ bodies.
Two great examples of machines designed with these benefits in mind are the Towable and UN-Towable Hydraulic Earth Drills, which share some key, user-focused features:
- The “teeter-totter” design allows the weight of the auger to be offset by the engine. This reduces the operating weight from as much as 100 pounds to as little as 40-50 pounds.
- The semi-pneumatic tires allow for easy push and pull, all while leaving minimal damage on turf, grass and other surfaces.
- Each drill only requires about 20 pounds of force to pivot it into position.
- An infinitely variable 20-degree auger tilt makes it possible to safely drill vertically in uneven terrain. The UN-Towable drill features a standard stationary handle and the Towable drill features a three-position handle that rotates 180-degrees allowing an operator to drill near buildings, walls and other structures.
- The rare forward-and-reverse auger feature allows the operator to ease the drill out of the ground as opposed to tugging heavily on the equipment, greatly minimizing the physical effort required to get the job done.
Equipment that allows operators to work smarter, not harder is a win for contractors and do-it-yourselfers alike. Drills that reduce operating weight and kickback while being easily maneuverable will allow operators to achieve the highest efficiency during projects and, most importantly, do so without injury.
“The Towable and UN-Towable units are perfect for individuals who need the power of a hydraulic earth drill without the operating weight and transportation challenges that can be associated with traditional units,” said Mike Hale, Little Beaver sales manager.

Last updated Mar 27, 2026
Tips For Preventing and Diagnosing Mechanical Earth Drills Issues
Mechanical drills’ high operating speeds and compact sizes make them a popular choice for contractors and rental centers — and ideal for drilling holes quickly. Although these transmission-powered machines have significantly more moving parts than their more costly hydraulic counterparts, simple knowledge of how to prevent and diagnose common problems will keep your drill running efficiently. Below are answers to questions we get often and some tips to help you achieve better ROI.
What steps can I take to minimize the risk of damaging the drill?
Start by choosing a unit with the correct gear ratio and auger for your soil. For soil with minimal rocks and few roots, a 10:1 gear ratio with a standard auger will provide fast and efficient results. For drilling in clay or other difficult conditions, a 10:1 gear ratio will still work, but switch from a standard to carbide blade to effectively cut through the soil. If you’re working in an area with rocks exceeding 3 inches in diameter, choose a drill with a 20:1 gear ratio reduction and a heavy-duty auger. The gear reduction slows the auger from 360 to 180 rpm and will pop the rocks out of the soil and continue spinning.
Should I be concerned that the gearbox is hot or making an unusual sound?
The gearbox will always be hot to the touch when the drill is operating. However, if the transmission is extremely hot, smells like burned oil or starts making unusual sounds, check the oil level. Oil leaks can occur around the seal, lower output shaft or the top of the transmission, and will lead to drill damage if ignored. Low oil also increases the risk of premature bearing wear, which can result in excessive heat and unusual sounds. To prevent early wear, check the transmission oil level and condition monthly or every 40 hours of operation.
The engine is running, so why won’t the auger turn?
A problem with the drivetrain, most likely along the flexible drive shaft, is to blame. To pinpoint the issue, start by inspecting the end fittings for cracks or breaks. If there are broken wires or sharp kinks, it’s time to replace the shaft housing. If things appear fine from the outside, remove the flex shaft for further inspection. To prevent flex shaft damage, clean, examine and grease the flex shaft every 50 hours of operation. Check your owner’s manual to determine the correct procedure for greasing the flex shaft.
Why does the clutch slip or cause the drill to jerk during operation?
Over time, a drill’s clutch padding wears, resulting in reduced performance when engaging the auger or accelerating the engine from idle to full speed. The clutch will continue to run, even if the padding is completely gone, leading to easily detectable problems. It’s best to inspect the clutch every 30 days or any time you lubricate the flexible drive shaft. Regular checks will help you track the wear so you can replace the clutch pads before the drill loses performance.
Why is the drill less efficient than it used to be despite everything working properly?
Too often, operators allow the points and blades to wear beyond the point of being effective. The drill can run perfectly and spin all day, but if the blades and points are worn, the unit will become less and less effective.
Where can I find additional resources?
Information is always available at your fingertips, including comprehensive maintenance brochures and video tutorials. These helpful tools are excellent resources and often include visuals as well as step-by-step instructions.
Knowing your drill, keeping up with maintenance and accessing additional resources when questions arise will go a long way toward successful drilling.