
Last updated Mar 27, 2026
Using an Earth Drill to Install a Mailbox Post
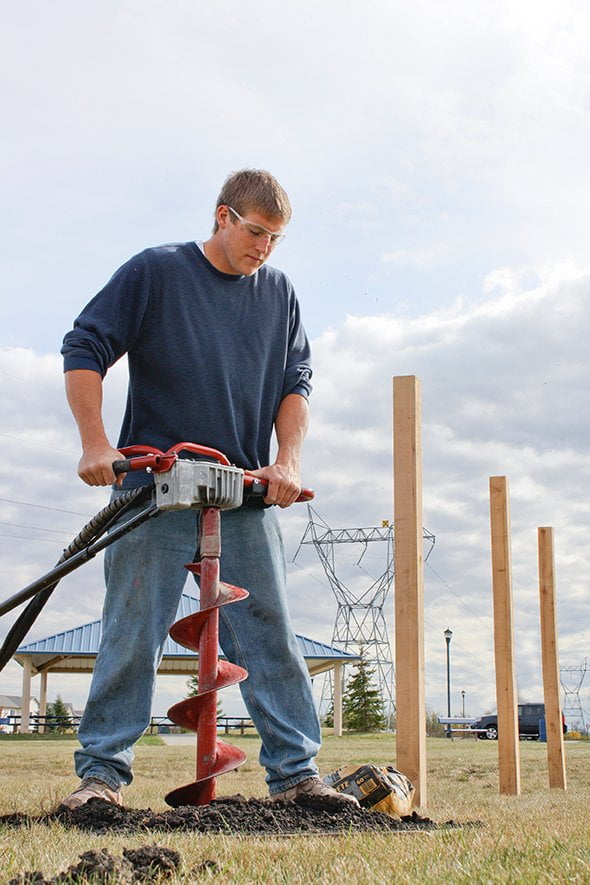
If you’re wondering how to install a mailbox post, you’re not alone. Mailbox installation is a very common do-it-yourself (DIY) project many homeowners take on. For the least labor-intensive option, we suggest renting an earth drill to get the job done. Using an earth drill, like Little Beaver’s mechanical or hydraulic earth drill, will not only be more efficient than alternative methods, it will also reduce the strain on your back and other potential injuries.
What You’ll Need:
- Little Beaver earth drill with an auger 3 times
wider than the post - Mailbox post (we suggest a 4×4-inch wooden post or
two-inch diameter steel or aluminum pipe) - 50-pound bag of concrete
- Mailbox
- Bricks or stone for landscaping (optional)
After gathering the necessary items, we suggest starting by calling 811 to mark buried utilities and checking the manufacturer instructions that came with your mailbox model. Once you have your Little Beaver earth drill rental, make sure to read the owner’s manual or work with your rental center to learn how to operate the drill. Once you’re ready to go, watch our easy set-up video to see the step-by-step process for setting up the drill and disassembling it for transportation. You can also contact the Little Beaver team with any questions!
Per USPS guidelines, a mailbox should be placed six to eight inches back from the curb and 42 inches off the ground. Once you’ve found the right spot, you can start a pilot hole using the earth auger. This is a small hole drilled into the ground to help guide the larger drill for a more precise drilling location. Once the pilot hole has been created, it’s time to put the earth auger to work! After you’ve drilled to your desired depth, typically 20-24 inches, simply lift the auger from the hole and you’re ready for the next step!
Although it’s possible to install a mailbox without concrete, we suggest taking this extra step for improved security and durability. After preparing a bag of fast-setting concrete, place the post in the hole and pour the concrete into the hole around the post. Make sure to allow a few inches of space at the top of the hole and use a level to double-check that the pole is straight. If it has shifted, adjust quickly before the concrete dries.
After the concrete has set, it’s time to attach the mailbox to your post! Most manufacturers have their own instructions for how to get this done, so we recommend following those closely. Once the mailbox has been attached, don’t forget to add your address. If your mailbox is on a different street than your home, USPS requires that you put the full street address on the mailbox.
Even though your mailbox is technically complete after adding your address, you can always go a step further by landscaping around the mailbox before returning your earth drill to the rental center. Earth drills have many uses, including DIY landscaping such as planting small shrubs around your mailbox post.
Last updated Mar 27, 2026
Snap-On Connections Offer Quick and Easy Auger Changes
One of the ways to maximize efficiency and get the most out of your earth drill is to use augers that you can change quickly as project requirements change. Traditionally, augers were screwed into the drill with a specific thread size that varies between brands. This connection was chosen for its secure attachment; however, it’s a time-consuming process that doesn’t allow for quick auger changes.
At Little Beaver, we offer snap-on auger connections for our earth drills to ensure you’re getting the strongest and easiest-to-use connection, so you can cut back on downtime and increase productivity in the field. A snap-on auger connection offers a quick and easy method to change augers on your earth drill while providing the strength required to hold up against rough terrain drilling.
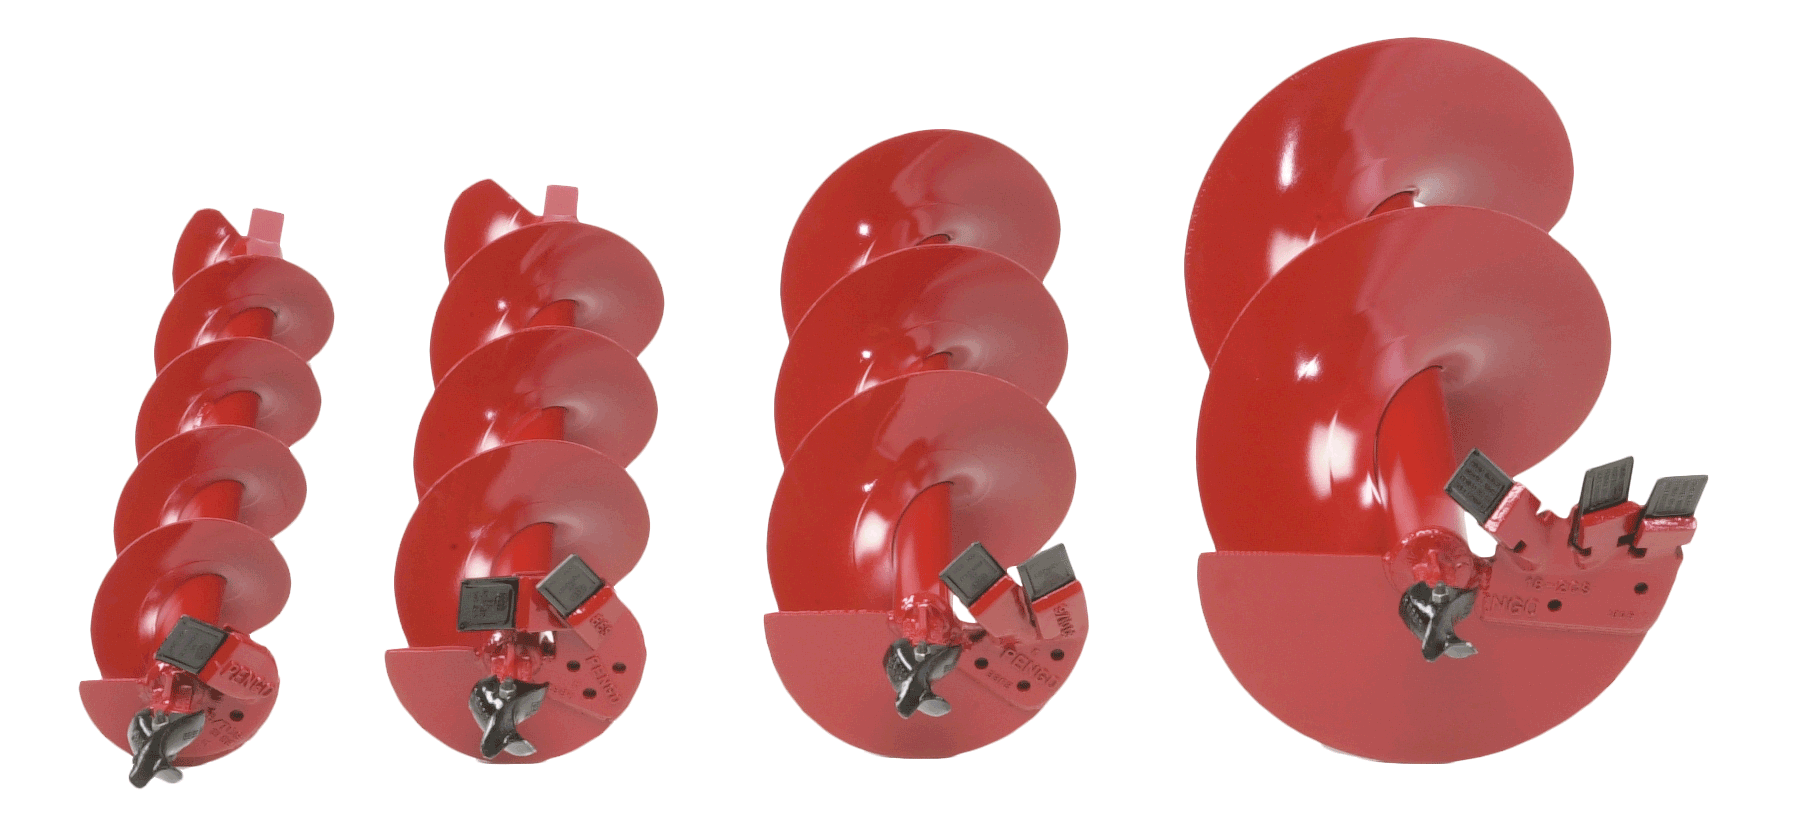
Snap-On Augers
Snap-on augers eliminate the need for long auger changeout times by featuring a convenient spring-loaded snap button that secures the auger to the drill head. Little Beaver offers 36-inch and 42-inch auger length options with 13 different diameters, so you can quickly change to the right auger for your project.
A standard snap-on auger excels in soft soils and can also bore through clay, frozen ground and hardpan soil when paired with the right points and blades. Standard snap-on augers are used for most projects. However, for rocky soils, we recommend our heavy-duty snap-on augers to avoid damage.
When a deeper hole is required, extensions make it easier to dig to your desired depth. Our auger extensions also feature the snap-on connection and are available in full flighted and tube versions, at both 18-inch and 36-inch lengths. Full-flighted extensions are available in diameters between three inches and 14 inches.
Hex Augers with Snap-On Adaptor
Smaller augers – between one to three inches in diameter – are too small to be made with the snap-on connector itself. So, our hex augers come standard with a snap-on hex adaptor. This adaptor connects the auger to the drill with a snap button connection, making the attachment quick and easy to use. These smaller augers are commonly used for soil sampling.
D-Series Augers
While a snap-on connection is ideal for many situations, some drilling applications, like soil sampling or foundation repair, require a stronger connection to match the drill’s higher torque. Little Beaver D-series augers connect to the Big Beaver drill and the Lone Star Drills line of soil sampling drills with a strong drive pin connection. This rugged alternative to snap-on augers provides an option to ensure the optimal match between auger and drill.
No matter what project you have in mind, we are here to help you get the best drill and auger combination for your application. Contact Little Beaver today!
Last updated Mar 27, 2026
Using an Earth Drill to Successfully Install Wooden Fence Posts
Installing wooden fence posts can be a great DIY project, especially if you’re renting an earth drill to make the job more efficient and less labor-intensive. Before you get started with your fencing project, there are a few things to know to set yourself up for success and prevent frustration in the future.
Plan Ahead
As tempting as it might be to start drilling as soon as possible, it’s important to call 811 and check local codes and ordinances before you drill. 811 is the national call-before-you-dig phone number that will send out a locator who will mark the approximate location of any buried utilities with paint or flags so you can avoid them. Some areas will also require permits before you build your fence, so make sure not to skip this step.
What You’ll Need:
- Shovel
- Gravel
- Level
- Concrete mix
- Mechanical earth drill with an auger 3 times wider than the posts
- Stakes (enough for each wood post)
- Wood posts (at least 8 feet in length)
- Rope (the length you’re setting your fence posts apart)
Lay the Foundation
The type of wood you choose for your fence posts will determine their life expectancy. It’s also important to look for chromated copper arsenate (CCA) pressure-treated wood, which will slow the decay of wooden fence posts over time. Pine is a popular choice for fences that can last up to 30 years when treated. Other long-lasting woods are redwood, sweetgum or cedar because they are highly resistant to moisture which helps prevent decay, cracking or warping.
Once you have the supplies you’ll need, carefully mark the location of each post with a temporary stake. When building wooden fences, it’s crucial to have the fence posts in a straight line, otherwise you’ll notice the poles weaving in and out of line after the poles have been placed. Stretch a long rope between each stake for a simple way to measure and mark the location of each post.
After you have marked the location of each post, it’s best to use a shovel to remove any sod you might be drilling through. Grass and vegetation can clog the end of an auger — especially when wet. This step might seem like a hassle at first, but it will save you time and frustration once you start drilling.
When it comes to picking a drill to rent, we suggest prioritizing safety. All Little Beaver earth drills incorporate torque tubes along with a slip clutch for added safety while drilling. A torque tube offers consistent safety by absorbing shock as you encounter different soil and resistance. On the other hand, the slip clutch offers protection for both the operator and the drill if you hit a rock or tree root while drilling.
Get Drilling
When the prep work has been finished, it’s time to get drilling. Make sure the auger enters the soil perpendicular to the precise point you marked with the stake and keep it vertical as you drill. It’s important to prevent the auger from entering the ground at an angle; otherwise, you risk setting a crooked fence post or a creating hole that’s difficult to backfill.
Dig the fence post hole so the diameter is 3 times the width of the post. For example, if the fence post has a 3-inch diameter, the hole should be about 9 inches wide. The depth of the hole should be one-third to one-half the post height above ground. For example, if the fence post is 9 feet tall, the hole depth should be at least 3 feet. If you live in a cold climate, it’s also important to make sure you dig your post below the frost line to prevent the fence posts from moving or heaving when the ground freezes in the winter. To dig below the frost line, check the local frost lines in your area and dig your hole 6-inches below that.
When the hole is complete, make sure to stop the auger and pull it out for a clean hole. To make this step easier than ever, Little Beaver mechanical earth drills have a lightweight design and our hydraulic earth drills feature a reverse button. Continue the drilling process until all fence post holes are complete.
Set the Posts
When all the holes are drilled, pour in about 3 to 4 inches of gravel. This will help with drainage as opposed to a post hole that’s filled entirely with concrete. Use a piece of scrap lumber or other blunt object to tamp down the gravel. This will ensure it doesn’t settle and allows for optimal drainage. On top of the gravel, add about 6 to 8 inches of concrete, and place your post in the middle of the mixture. Using a level right after this step will help to make sure the post is properly positioned. Once the concrete is leveled, fill the rest of the hole by backfilling the dirt and tamping as you go. From here, follow the instructions on your concrete mix to see how long it will take to dry.
After this step, your fence posts are ready to go, and the rest of your fence can be assembled. If you have any questions regarding drilling holes for fence posts with a Little Beaver earth drill, don’t hesitate to contact the Little Beaver team. We’re happy to help with any questions that might come up.

Last updated Mar 27, 2026
How Earth Drills and Mini-Trenchers Can Streamline Yard Projects
Landscaping keeps your lawn protected, healthy and looking great. Whether you’re doing a full landscaping project or just adding a sprinkler system, Little Beaver has tools that can help speed up your work. Keep reading to learn how our Mechanical earth drills and Kwik-Trench mini-trenchers can help your next project go quickly and smoothly.
Mechanical Earth Drills
Mechanical earth drills cut down on the time you spend digging holes. If you’ll be planting trees or shrubs, or installing mailboxes or fence posts, you’ll find that using an earth drill significantly speeds up the process while creating consistent holes that meet the size requirements of your project.
Little Beaver Mechanical earth drills combine a compact, lightweight design with additional safety features to allow safe and efficient one-man operation. Our torque tube reroutes kickback from the drill away from the operator, making it one of the safest drills for single person operation. One-man drilling projects can be dangerous, but Little Beaver earth drills help ensure your project is done efficiently and safely.
Kwik-Trench Mini-Trencher
Traditionally, landscapers have used shovels and other gardening tools to break up soil to dig trenches for edging or underground wiring or sprinkler lines. This process is time-consuming and physically grueling. That’s why Little Beaver offers a mini-trencher.
The Kwik-Trench features a simple, push-forward design for easy operation and enhanced operator safety compared to competitive pull-back models. This mini-trencher cuts trenches up to 12 inches deep and 4 inches wide, neatly depositing the soil on one side of the trench to make backfill quick and easy.
Horizontal Boring Kit
When installing underground wiring or sprinklers, you might need to run a portion of the line underneath a driveway or sidewalk. To do so, you’ll need a reliable, safe equipment option to easily bore underneath the concrete or asphalt. Little Beaver’s horizontal boring kits attach to our Mechanical earth drill providing both dry and wet boring opportunities.
The sidewalk boring kit includes a 5-foot auger with a 3-inch diameter bit, a horizontal drill key and a 5-foot extension with a universal wiggle joint. Once connected to a drill, the horizontal boring kit can bore underneath a standard sidewalk. If you need to bore a longer distance, we also offer the driveway boring kit. The driveway boring kit includes a 2-, 3-, or 4-inch water drill bit with a swivel adapter that connects through swivel assembly and a horizontal drill key. This kit can bore up to 50 feet under driveways or parking lots.
No matter what landscaping project you have planned Little Beaver can help. Let us help you choose the best Little Beaver product for your landscaping project. Contact us today!

Last updated Mar 27, 2026
Using an Earth Drill to Safely Speed up Your Do-it-Yourself Projects
If you’re working on do-it-yourself (DIY) projects that require digging holes, earth drills exist to make your life easier. Instead of manually digging a hole, earth drills use a rotating spiral auger or pipe with blades attached at the lower end to cut through the soil easily and efficiently.
Whether you’ve rented before or you’re looking into tackling your first project with an earth drill, there are a few factors to consider that can help make the job easier and improve safety during your project.
Why Use an Earth Drill?
Earth drills can be a great solution for DIY projects because of their ability to dig a hole in a matter of minutes without wearing down your body. If you’ve got deep digging projects for backyard fences, decks or even installing a mailbox post, an earth drill will be a valuable asset. Since all drills from Little Beaver are designed for safe one-man operation, you can truly do it all yourself — no reluctant family members needed!
Mechanical Earth Drill 101
A mechanical earth drill is one of the most common models offered from rental centers because of its tried-and-true performance and user-friendly design. Mechanical earth drills from Little Beaver can take on everything from soft soils to dense, rockier applications and drill small to medium diameter holes. The high auger speeds on mechanical drills make for fast project completion while the lightweight design maximizes mobility. If you’re working on a deck, fence or landscaping project such as planting trees, the mechanical earth drill is a perfect choice!
Hydraulic Earth Drill 101
Hydraulic earth drills are a good choice for clay, rock or frozen ground. The durable body and high torque of these drills make them perfect for powerful drilling of larger diameter holes. An added benefit of renting a hydraulic drill from Little Beaver is the reversible drive for easily removing the drill from holes. Although a hydraulic drill can be used for fence building and landscaping just like a mechanical drill, it is also strong enough to handle work with post holes for pole barns, anchoring projects for mobile homes or industrial fencing.
Towable and UN-Towable Earth Drills
Some rental centers might offer more variety in their hydraulic drill selection with the addition of our Towable and UN-Towable models. These units are perfect for those who need the power of a hydraulic earth drill without the operating weight and transportation challenges that can be associated with traditional hydraulic drills.
The Towable earth drill can be transported behind any vehicle with a standard hitch using a removable “no-tools” towing hitch, which also saves valuable truck or trailer space. The UN-Towable drill has a removable power pack that reduces the overall weight of the drill by 50 percent. This drill can still be transported on the back of a vehicle, but the wheels hover above the ground during transportation for faster travel speeds and reduced wear and tear on the drill.
Both the Towable and the UN-Towable drill are designed so their frame bears the brunt of the operating weight, not the operator. The “teeter-totter” design allows the weight of the auger to be offset by the engine, lessening the impact on the worker during operation.
Customize Your Drill
With a variety of earth drills available, you can also easily customize the drill you rent based on soil type, hole size and auger speed requirements to make sure you have the best tool to tackle the job ahead. Little Beaver offers several different auger widths to fit a variety of drilling applications and to make your job easier than ever. This can be a good tip to keep in mind as you’re working with your local rental center to determine what you need for your project.
Is it Worth the Risk?
Over the years, earth drills have gained a reputation for being both powerful and dangerous. Stories of operators being thrown from the drill are enough to make some DIYers question if it’s worth the risk. Little Beaver has been focused on safety from the start and took extra steps to design a system with features to protect the operator, like torque tubes to absorb shock on both mechanical and hydraulic earth drills. These torque tubes work by distributing heavy vibrations and force to the engine carriage instead of the handles so one person can safely and comfortably operate the drill. An additional bonus is that the torque tube reduces effort and fatigue while drilling so you can easily complete a project while hardly breaking a sweat.
Be sure to ask your rental center about proper operation. Earth drills are meant to make your DIY project as easy as possible so you can stay safe and be confident as you drill.