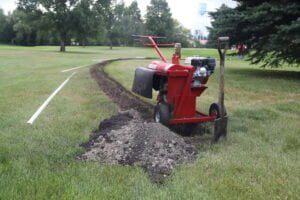
Utilizing a Mini-Trencher to Bury Dog Fence Wire
Wired electric dog fences are growing in popularity as a way to safely contain your dog without the hassle of installing a traditional fence. In addition to increasing curb appeal, electric dog fences work well for odd-shaped yards, create a stronger signal than wireless fences and can be easily expanded with the addition of more wire.
When it comes to installing electric dog fence wire, there are a variety of ways to do it. Instead of straining your back with manual installation methods, we recommend renting a mini-trencher like the Kwik-Trench to get the job done. Here are the steps to complete the work as easily as possible.
What You’ll Need:
- Dog fence containment system

- Kwik-Trench mini trencher
- Twisted wire
- Wire cutters
- An electric drill (optional)
- Splicing kits
- Shovel
Establish the Boundaries
Once you have everything you need, plan the boundary for your dog. Whether that’s sectioning out a dog-free area or laying boundaries in a large yard, it’s important to plan just how much access to give your dog. Make sure to check the manual that came with your electric dog fence during this step for any restrictions or local guidelines.
You’ll need to make note of a few areas to consider while establishing this boundary. The first is to find an electrical outlet where the transmitter box will be located. Many homeowners choose their garage or shed. The other area to mark is where you want your dog to be able to cross the wire safely, such as through doorways.
Create Crossing Points
To create points where your dog can cross safely, use a pair of wire cutters to snip the wire in the location you need. Make sure to also disconnect the wire from the transmitter box by removing the pin of wire. Then, take some twisted wire and twist it together with the dog fence wire so there is around one twist per inch of wire. A good rule of thumb is the more rotations the better. If you’re hoping to create a lot of cross points for your dog, using an electric drill for this step can make things easier.
Once the cross points have been twisted, splice the twisted wire and place it back inside the boundary loop. We suggest a splicer kit for this step to make the process easier. Then, connect the twisted wire to the transmitter box.
Time to Trench
It’s worth noting that some will try to staple the electric wire above ground for an easy solution, but this will shorten the lifespan of the wire when rodents, the dog or weather degrade the wire. It can also pose a tripping hazard or get caught in lawnmowers. A better solution is digging a trench to bury the wire, and renting a mini-trencher is both easier and more efficient than manual methods. Dog fence wire should be buried 3 to 5 inches below the ground. This is deep enough to protect the wire from animals and weather but shallow enough to maintain a strong signal.
To get started with a mini trencher like the Kwik-Trench, watch this helpful video for how to operate the machine. As the trencher is warming up, make sure to lock the swivel wheel to trench straight lines. Once the swivel lock is in place and the trencher is warmed up, use the manual crank control to adjust the cutting depth and simply push the trencher forward. With a mini-trencher like the Kwik-Trench, you can dig up to 30-feet of trench per minute. If your trench needs to follow curved lines in some areas, simply unlock the swivel wheel to easily move around small yards or hard-to-access areas.
Backfill it Up
Once the trench has been dug, place your dog fence wire inside and get ready to backfill. When using a Kwik-Trench, backfilling is easier than ever because the machine neatly deposits the soil right next to the trench so you can simply push it back in with a shovel. An added benefit of using a Kwik-Trench for burying dog fence wire is the pneumatic tires that won’t damage turf. This means after backfilling your trench, your job is complete – no additional clean-up necessary!
If you have any additional questions about how to dig a trench for an electric dog fence, don’t hesitate to reach out to your local rental center or a Little Beaver expert. We are happy to help make your project go as smoothly as possible!
