Last updated Mar 27, 2026
Maximize Drill Performance
Operators sometimes forget that points and blades need regular maintenance just like an earth drill does. Too often, these small pieces are forgotten in the day-to-day shuffle of drilling projects. However, forgoing routine maintenance on these critical parts can lead to a decline in drilling performance or even a complete breakdown on the jobsite.
Proper maintenance and replacement of common wear parts keeps your earth auger operating at peak performance. Like the drills they are mounted on, augers, points and blades require routine maintenance.
- Check the placement of the points and blades every day. Misalignment might cause the auger to vibrate excessively or “walk” during use.
- Ensure you’re using the right points and blades for the soil. Standard options work for loamy soils or areas with few rocks while hard clay or frozen ground requires carbide blades. Having the right points and blades will protect the auger from damage and make your drilling project easier.
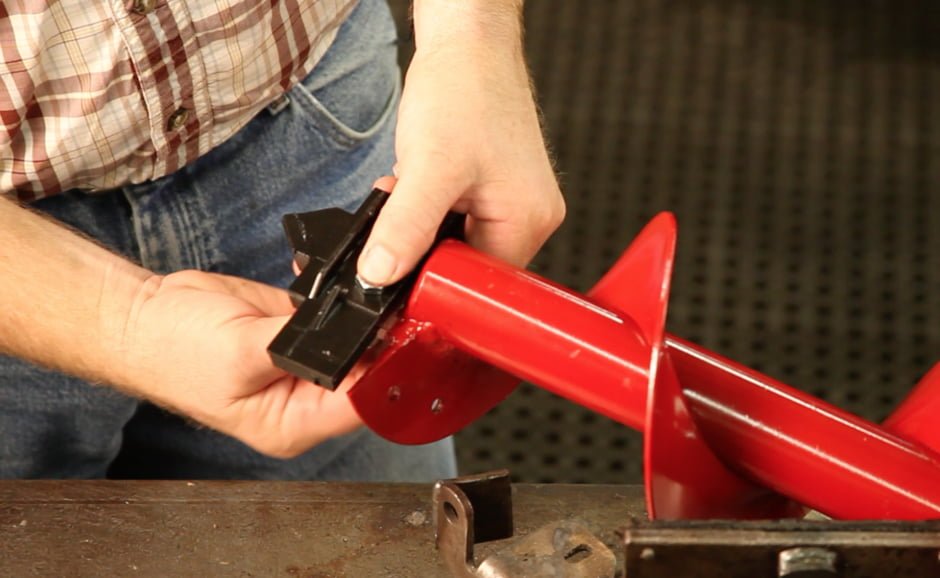
- Replace worn attachable points and blades before they reach the auger flighting. Operators can replace these parts quickly with basic hand tools, such as a wrench or ratchet set. To learn more, check out our video below.
- If the blades wear down far enough to damage the flighting, operators will need to repair the auger flighting by welding the material or replace the entire auger.
- A good rule of thumb is to never operate a drill with damaged or missing parts, which includes the auger.
Our earth augers feature abrasive-resistant steel and hard surfacing on the edges of the points and blades. Another benefit of working with Little Beaver is that our points and blades are reversible, which means you get twice as much work out of one point or blade.
The time put into maintaining smaller wear parts protects against larger repair costs if the drill is damaged or breaks. Keep an eye on maintenance schedules to prolong the life of your Little Beaver earth drills.
Last updated Mar 27, 2026
Prevent Costly Repairs and Downtime
Keeping up with routine maintenance and operation best practices can help keep projects running smoothly and prevent costly repairs and downtime. If you follow these quick and easy tips, the Kwik-Trench mini trencher is sure to provide many years of unmatched service and profits.
1. Check the engine nuts and bolts after every 25 hours of use and tighten, if necessary. Also, add sealant to bolt threads at that time to prevent leakage.
2. Change the engine oil after every 10 hours of use, according to engine manufacturer’s instructions.
3. Clean the air filter after every 10 hours of use. In dusty or dry conditions, increase cleaning frequency. In extremely dusty conditions, protect the engine by attaching a remote air filter with a pre-cleaner, which will extend the engine life.
4. Check the slip clutch facings’ thickness after every 20-25 hours of use. If it has worn to 1/16-inch thick or less, change it to maintain its 30-feet-per-minute trenching speed.
5. Grease pillow block bearings after every 100 hours of use to reduce wear and prevent corrosion.
6. Clean vertical frame posts and sleeves frequently to prevent binding. Use a silicone lubricant rather than an oil-based lubricant or grease.
7. Check for missing teeth after every use. Using the Kwik-Trench with missing teeth will increase the possibility of engine vibration. Be sure to replace the disc blade if it’s missing teeth before the next use. Prevent teeth breakage by backing off immovable objects.
8. Do not drop machine off the back of a vehicle. This may cause damage to the body and frame. Machines should always be lifted off, ramped or transported by a trailer.
For additional questions or tips, review the product manual or contact us today.
Product Manuals: KT100 | KT200B | KT1200B | KT2400B
Last updated Mar 27, 2026
Stay a Step Ahead of Your Drill’s Maintenance
Routine preventative maintenance is crucial. It boosts uptime and ROI for earth drills, which means faster project turnarounds and hassle-free hole digging — all while reducing your service costs.
To help you stay a step ahead of your drill’s maintenance, our Little Beaver team created a video series that aims to reduce downtime and increase service life for your equipment. In addition to step-by-step maintenance instructions, the videos provide information regarding best practices and tips for getting the most out of your drill.
Our videos address the most common issues encountered with Mechanical and Hydraulic Earth Drills and provide in-depth troubleshooting advice.