Last updated Mar 27, 2026
By Ryan Tollefsen Realtor,
Keller Williams Realty Alaska Group
When homeowners make a plan for a curb appeal upgrade, there is often a lot of discussion about what is necessary and which ideas are practical. Having the proper tools for any home improvement project is crucial for its success. Since curb appeal is so important for home value, homeowners want to be sure they can do it right the first time. Here are a few tips (and tools) that ensure greater accuracy and make the whole project easier.
Why Every Home Needs Curb Appeal
Although some homeowners do not think about curb appeal until they want to sell a home, many choose to maintain or improve their exterior systematically over time.
The view of the home in relation to other homes in the neighborhood is what makes up what is called, “curb appeal.” Why does one home look better than others on the block? Curb appeal is a vital part of the home’s overall value. Even if homeowners have just moved in and do not plan to sell for many years, preserving home value should always be on their minds. They may need it if they want to refinance their mortgages, get a home equity loan for other improvements, or sell the home unexpectedly.
Here are two high-impact improvements to consider when looking to boost a home’s curb appeal:
Highlighting With Landscape & Outdoor Recreational Lighting
There are many things that homeowners can do for their properties to accentuate the wonderful aspects that are already there. Lighting is a good example. Landscape lighting is an excellent way to make the perfect look for the property at night. Lighting can also be used for outdoor recreational lighting to entertain guests or simply enjoy a change of scenery at night.
Of course, installing lighting outside often involves digging the electrical lines for the lighting. Doing this by hand, homeowners could spend hours putting strain on their backs digging down 6 to 12 inches so that they can install their sidewalk lighting. Alternatively, they could use a Little Beaver Kwik-Trench mini-trencher to save their backs and a great deal of time. The Kwik-Trench allows homeowners to:
- set the perfect depth for the trench
- move at a rapid pace
- reach spots that a larger trencher cannot access
Installing landscape lighting should not have to be a task that takes days or weeks. With this tool, the job will be done much more quickly.
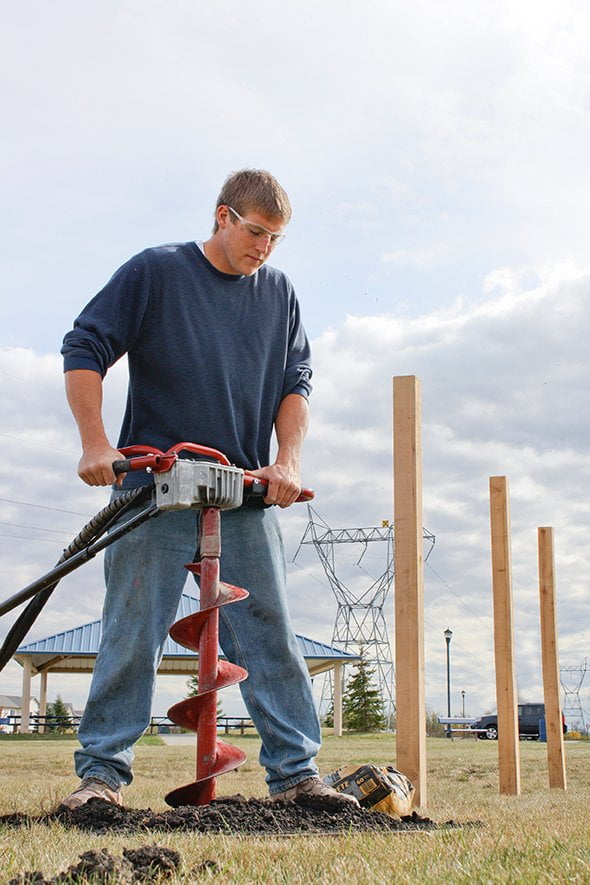
Building the Ideal Perimeter Fence
Curb appeal concerns more than just the home and garden. That is why homeowners often look for ways to create attractive fencing or barriers surrounding the edges of the property. When homeowners need to install trees, vegetation or fences, they usually need to drill or dig using an auger. The best augers make it simple for people to dig a hole through any type of soil, of any width and a variety of depths. Snap-on augers offer exactly what homeowners need, with a design that is practical for almost anyone to use.
Planning Into the Future
Homeowners may be surprised with just how many projects they can accomplish with the right tools. Homeowners who used a trencher to install lighting might decide to call on it again to build a new garden, or change up their landscaping design. An auger with removable blades is a useful implement to keep on hand for landscape maintenance and other digging projects.
Building curb appeal for a home is less a single task than it is a state of mind. Taking advantage of tools that simplify the work allows people to ensure their homes look great every year without wasting time or effort. When homeowners use the right tools it creates the opportunity to do much more, both inside and outside the home.
Last updated Mar 27, 2026
Boost Productivity Without Tearing Up Greens
Looks matter — especially in the golf course industry. Maintenance and landscaping improvements are ongoing, but finding an equipment solution that provides maximum efficiency with minimal disruption to the green is key to maintaining that country club appearance. Little Beaver’s Kwik-Trench mini trenchers — the KT 200B and KT 2400B — are the ideal solution for boosting productivity without tearing up your greens.
Little Beaver understands that your golf course requires:
Efficiency
Save yourself from backbreaking and time-consuming work. The Kwik-Trench effortlessly cuts 30 feet of trench per minute. Powered by a 5.5-horsepower Honda engine, the KT 200B achieves 8-inch depths and its carbide-tipped teeth produce a trench from 1 to 3 inches wide. An 8-horsepower Honda engine powers the KT 2400B for cutting trenches as deep as 12 inches while its carbide tipped teeth produce a trench 1 to 4 inches wide. Both models make backfill 50 percent faster by directing soil to one side of the trench, instead of both sides.
Enhanced aesthetics
Protect your course’s beauty against soil cupping that can occur after backfilling wide trenches. The narrow trenches created by the Kwik-Trench require minimal backfill, which reduces the chance of cupping and helps ensure consistent grass growth. Designed with your turf’s appearance in mind, mini trenchers also feature pneumatic tires that virtually eliminate damage caused by tracked machine or skid-steer type trenchers.
Easy use
Its compact body and push-forward capability allow greenskeepers to maneuver easily in tight spaces while pruning tree roots as thick as 10 inches in diameter. The push-forward operation also enhances safety by giving the operator a clear view of what’s ahead. By contrast, trenchers that require the operator to pull it while walking backwards add the risk of tripping and falls, which might cause costly workers’ compensation cases.
Little Beaver designs the Kwik-Trench for minimal maintenance by protecting key components. Its built-in slip clutch, for example, protects the drive train from shock if the trencher hits a rock or other obstacle. Maintenance is further reduced with blades that are quick and easy to replace. The Kwik-Trench also features Little Beaver’s Super Blade Plus and Super Xtra Rock Teeth, which bolt on to the cutting wheel making replacing the teeth simple and inexpensive. Other manufactures weld teeth directly on the cutting wheel causing the entire wheel to need replacement when a single tooth is damaged. The Kwik-Trench also features a triple V-belt system that maintains positive traction if the trencher encounters an obstruction. This reduces wear on belts as well as need for frequent belt replacements.
Improve your course’s quality in minutes with a Little Beaver Kwik-Trench. Contact us for questions.
Last updated Mar 27, 2026
4 Tips for Building the Perfect Fence
You’ve become an expert in landscaping throughout the region. From planting trees and flowers to installing decks and curb edging, you’ve completed many projects for satisfied customers. Now it’s time to step up your game and add fence installation to your services.
Let these fence-building tips lead you to success.
1. Get Answers.
Start like you would with any project, by working with the homeowner or business owner to establish the size, scope and specifics of the project. To do this, always have a set of questions ready that will get to the heart of the project. What kind of fence does the customer want? What will the layout be? Where do they want gates? How high should you build it?
Check with city building codes and, if applicable, neighborhood association rules, so that the fence specs meet all of the codes. If the city assessor has not surveyed the property recently, you’ll want to coordinate that to ensure the fence is built in the proper location and, depending on the area, you may need a permit. Call 811 a few days prior to digging to have utility companies mark underground utility lines, gas pipes and sprinkler systems.
2. Get Your Tools.
Selecting the right hole digging equipment will help you finish on time and on budget. If it’s a small project, you might use a hand-held posthole digger. If you’re doing more than a dozen holes, though, it will be slow work to muscle each hole clean. To tackle bigger or multiple projects, you’ll want the speed and ease-of-use that comes with an earth drill. A Little Beaver mechanical one-man or hydraulic drill can bore each hole in less than a minute with little effort. It’s equally important is to make sure you select the correct auger, points and blades for the soil type you’re working in. This will help you dig holes faster with less pain.
3. Get it Straight.
You can’t get a straight fence without evenly spaced holes and firmly set posts. Set the spacing by marking and digging all corner and gate post holes first. Run a string from corner to corner and then measure the post spacing along the line.
For chain link fences, space postholes no more than 10 feet apart. For wooden fences, posts usually stand 6 to 8 feet apart. If installing posts in soft soils or windy areas, use a hand posthole digger to flare out the hole, creating a bell shape for more stability. The hole diameter needed is based on the size of the post used. For instance, a 4-by-4 post requires an 8-inch diameter hole. This can be easily achieved with Little Beaver’s snap-on augers that range in diameter from 1.5 to 16 inches. Holes are typically 24 inches deep, but you’ll need to ensure the depth is 3 inches below the frost line to prevent posts from cracking in the frozen ground. In some parts of the northern U.S. and into Canada, that means going as deep as 4 feet. If you’re in windy areas or sandy soil, you may want to dig your posts even deeper.
4. Get the Concrete.
Position the posts so that they are the correct height and plumb; even the slightest lean can create a slanted and potentially unstable fence. Next, shovel concrete into each hole. Avoid touching the post, which could cause it to move. Choosing concrete rather than a dirt and gravel mix will give the fence better stability. Allow 24 hours for the concrete to set, and then attach the chain link fabric or wood framing and face boards. With both types of fences, complete the gates last.
Once you’re done, it’s an ideal time to touch base with your customer on fence maintenance and landscaping recommendations. A job well done here can translate to more work, whether from this customer or referrals, as you continue to expand your landscaping services.
Feel free to contact us for further fence-building tips; or general questions on our full line of augers, one-man earth drills and two-man earth drills. We’re always happy to provide the tools and assistance you need.