Last updated Mar 27, 2026
Store Your Earth Drill Properly this Winter
Most contractors and rental centers that employ earth drills will experience an approximately 3-4 month winter period in which the equipment is not being used. Before storing your Little Beaver earth drill for the season, take some time to thoroughly examine the drill and ensure that all components are in working order. The simple steps below will ensure your machine is ready to go in the spring.
Hydraulic Hibernation
To prepare a hydraulic model for storage, remove the shroud between the tank and the engine to inspect the coupling component. Make sure the rubber spider is not worn or missing pieces. Check for hose leaks or loose connections and look for any cuts or cracks that might be causing them. Additionally, lock the drive head into the “storage” position by pivoting the handle.
Don’t leave your machine out in the cold all winter. Hydraulic oil thickens as it becomes cold, which could damage the hydraulic system and the hoses. The hydraulic oil needs to be changed every three months or 100 hours of use, so it’s more efficient to simply drain the oil for the storage period; just don’t forget to replenish it in the spring. You should use premium mineral oil with anti-wear and anti-foaming additives. If you are using the drill in frigid temperatures, we recommend ISO VG 32-grade oil (46 for normal temperature operation and 68 in warmer climates).
Year-End Mechanical Maintenance
Routine maintenance during active drilling periods of the year keeps your machine primed for the most rugged applications. This includes inspecting, cleaning and lubricating applicable parts for every 30-40 hours of use. But when your drill’s hard work is done and it’s time for its seasonal slumber, ticking off some end-of-the-year checkboxes will make sure it’s ready to go next spring.
Store the drill so that the flexible shaft is stretched straight and not curled up; check for cracks or wires on the outer housing. Look for rust on the push button connector and if you find any, wipe it down with WD-40. Check out the throttle cable as there’s a good chance you’ll need to take things apart to clean it. If frayed, it should be replaced.
Ready for Spring
Some storage preparation steps apply to both hydraulic and mechanical units. There are a couple of options for winterizing the gasoline-powered fuel system of your mechanical or hydraulic drill. The simplest is to completely drain the gas tank. You can also add fuel stabilizer solution, which forms a protective layer by bonding with gasoline to prevent evaporation. It also stops the buildup of sticky resins that can destroy a carburetor and remains effective for up to one year.
Fuel stabilizer is recommended any time a gas engine, especially an older one, will be out of use for three weeks or more. Fill up the rest of the tank upon taking it out of storage, as this will diffuse the stabilizer. Non-ethanol gasoline is best for this type of equipment, especially when putting it away for storage or filling up in the spring. Ethanol’s corrosive effects increase the longer the machine sits idle, and the blend doesn’t always mix well with stabilizer. Once this is done, grab a couple wrenches and tighten up all bolts, as they can become loose through the course of routine drilling and transportation.
Always store earth drills in a warm, dry space. Left to the elements in a high-moisture area, the steel will eventually develop rust. Make sure to keep them in a space that doesn’t get heavy foot traffic so it won’t get knocked over or otherwise disturbed, especially if there is a chance of animals or small children being nearby.
Don’t leave the blades dull or rounded since drilling with them can damage the flighting of your auger. Install new blades if they are replaceable or sharpen your carbide blades. Sharpen with a carbide bench grinding wheel tilted to a 5-7 degree relief angle. Clean your blades with warm, soapy water. Do not use a pressure washer, which is too abrasive and can cause damage.
Your Little Beaver Needs a Little Love
Properly storing your earth drilling equipment will keep it running smoothly for many years to come. For any maintenance questions, reference your owner’s manual, check out our online service videos or contact us for direct consultation.
Last updated Mar 27, 2026
Solutions to common hydraulic drill troubleshooting questions
Using a hydraulic earth drill can make your projects easier than ever, which is why we want to do everything we can to make sure it’s operating in peak condition. Whether you feel like your hydraulic earth drill might be losing power or the starter rope is becoming difficult to pull, you’ll find the solutions to these questions and more right here.
Making the Starter Rope Easier to Pull
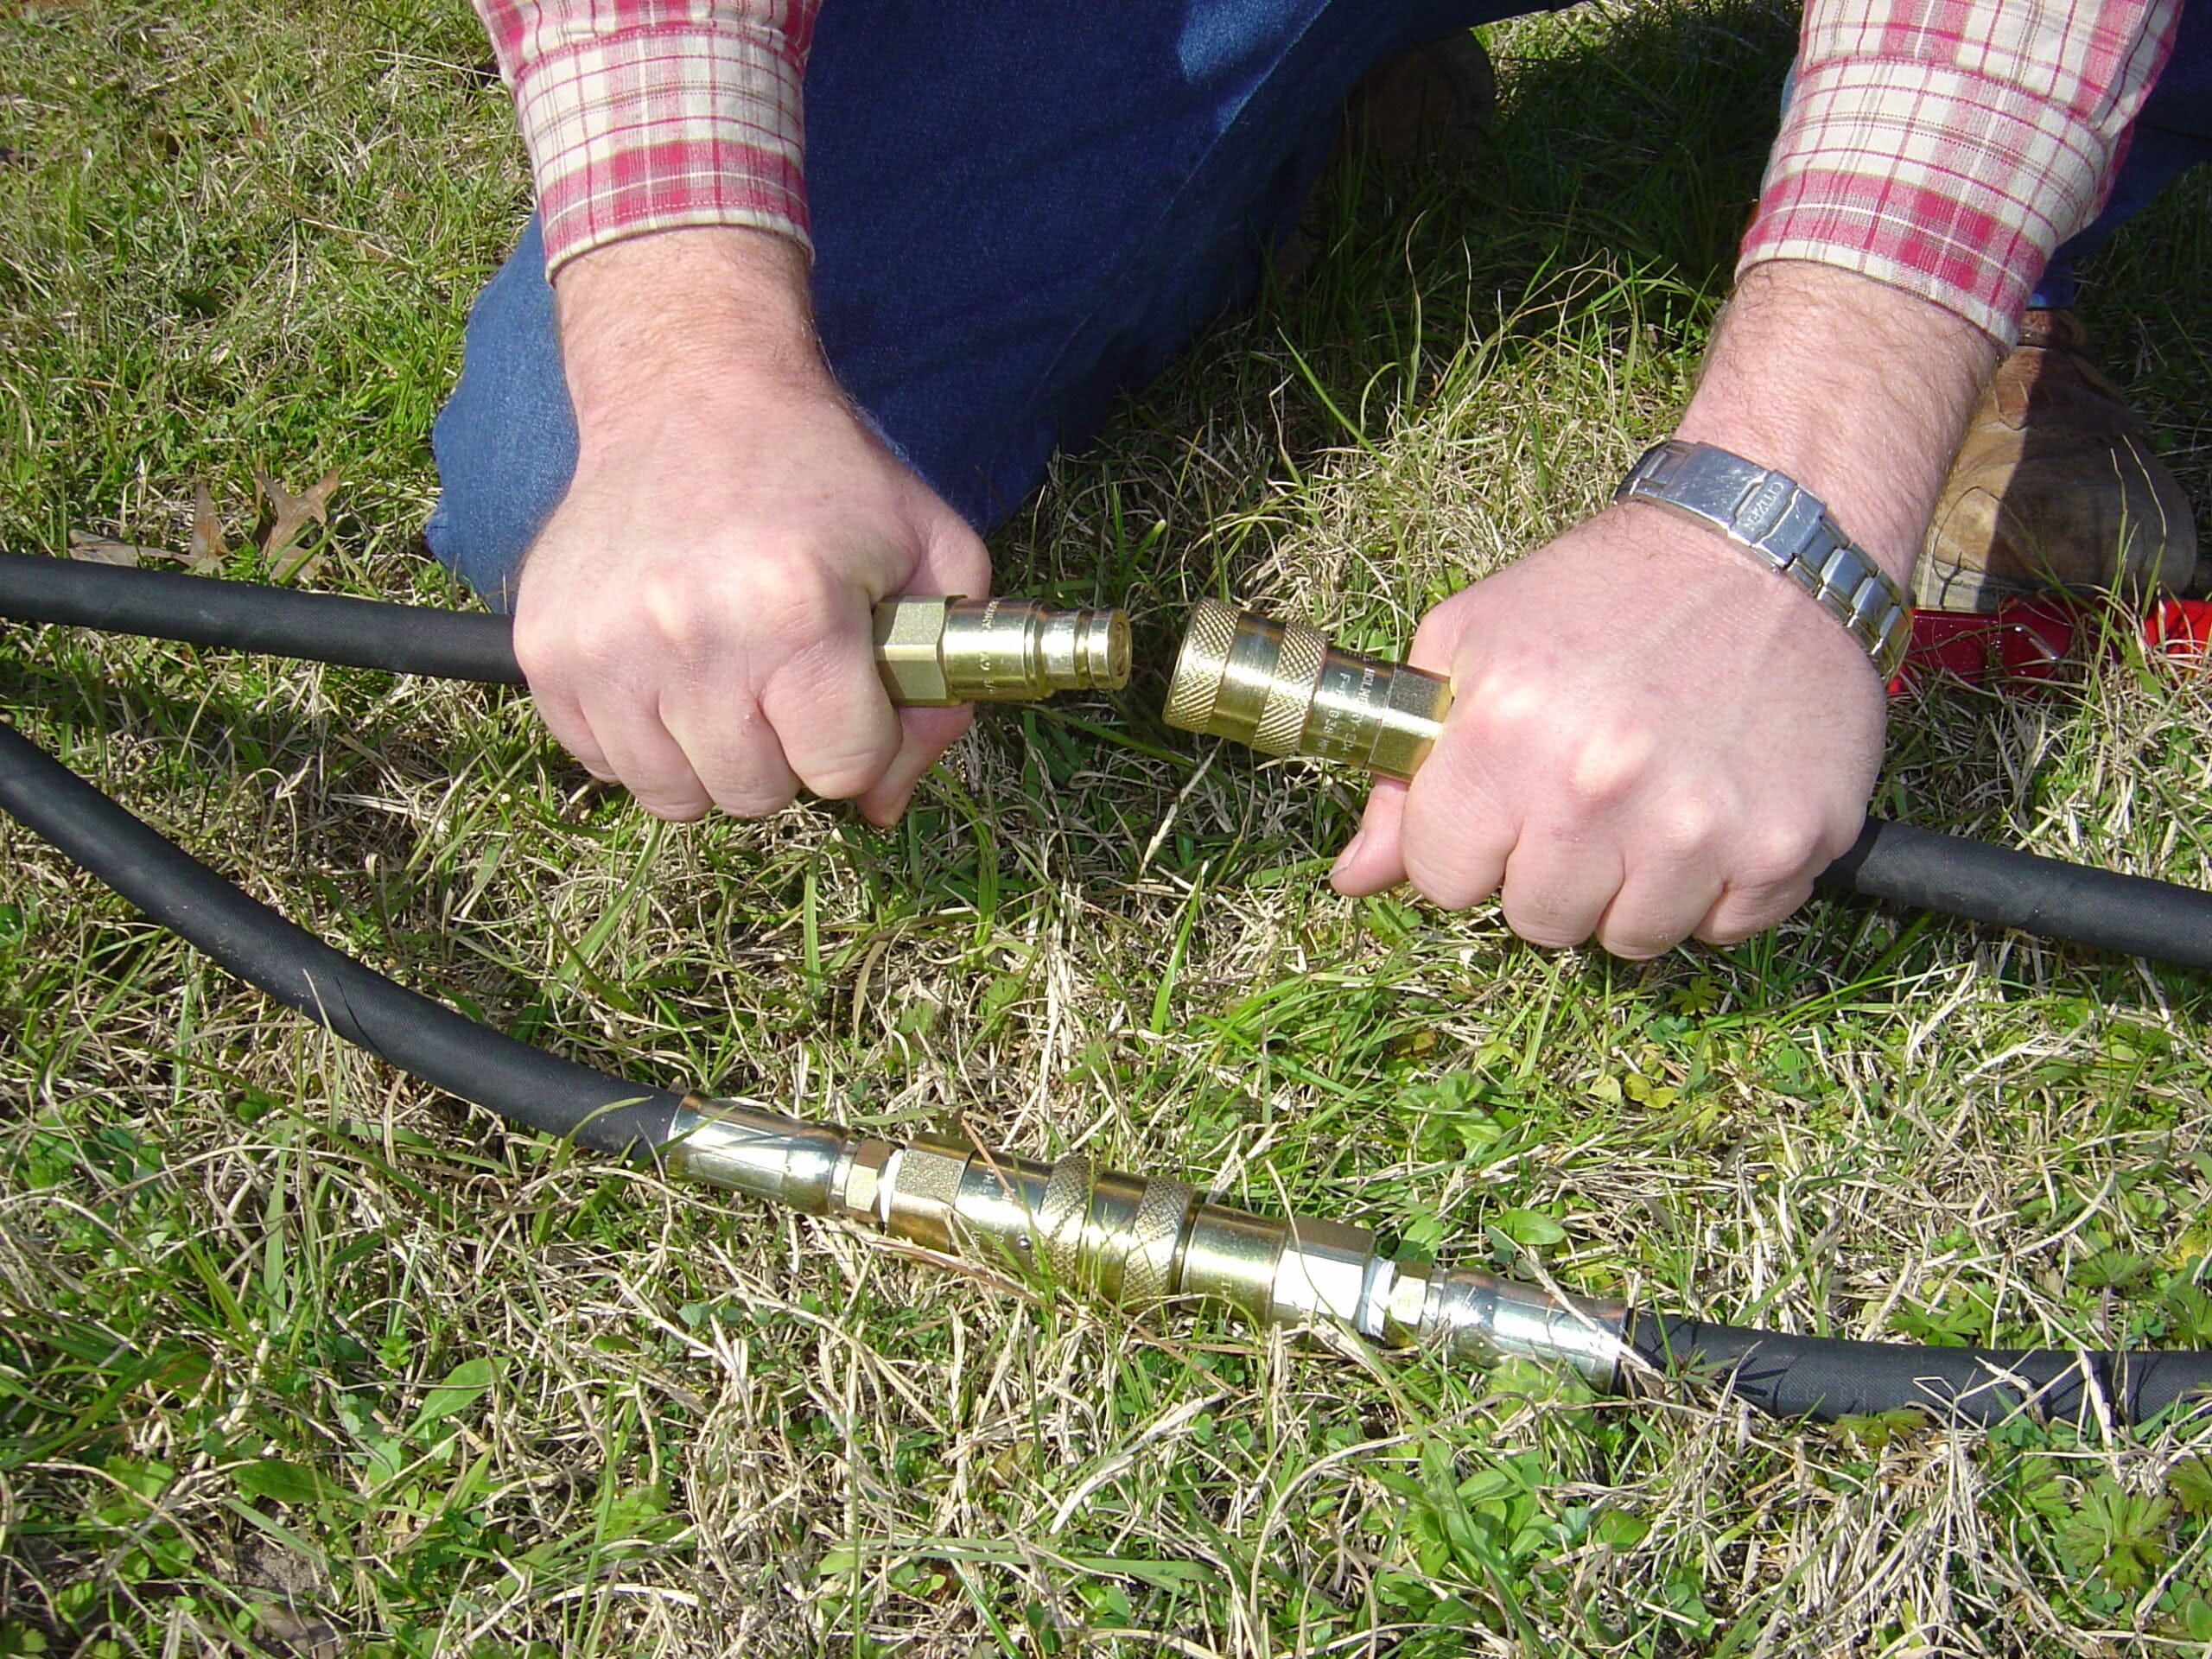
If it’s difficult to pull the starter rope on your hydraulic earth drill, check to make sure the quick disconnect couplings are fully engaged. Quick disconnect couplings provide fast and easy connection of fluid lines to easily start the drill. When they are not fully engaged, pulling the starter rope can be difficult.
The hoses can be easily connected without using tools. Connect the handle to the power source, attaching the return side first. This is the long hose that comes from the return line filter. Then, connect the pressure side of the handle to the power source.
Fixing Auger Turning Issues
When the auger turns fine in one direction but does not turn or turns very slowly in the other direction and stops when hitting the ground, your valve control linkage is most likely bent.
The valve control linkage is a small rod that connects the control to the valve spool. To fix this, straighten the linkage, making sure the flat part of the lever (the part you push or pull with your fingers) does not touch the handlebar at any time.
Improving Drill Power
If your hydraulic earth drill appears to have lost power, double check the oil that was used at the last service interval. Some retail or automotive stores sell multipurpose oils designed for tractors that are labeled “hydraulic oils.” These oils are not suitable for the Little Beaver power source because they have different additive packages. This can cause the hydraulic components to degrade faster and power to decrease due to friction and internal leakage. If you find that inappropriate oil was used, we suggest having your hydraulic drill checked by a reputable service dealer or calling us at 936-327-3121 and replacing the oil to avoid long term damage. It’s very important to always use the recommended grade when replacing hydraulic oil and to be sure to follow a schedule for regular oil changes.
If the troubleshooting solution you’re looking for isn’t listed here, take a deeper look into our service FAQs for hydraulic earth drills or check out the owner’s manual. If the answer to your problem still isn’t coming up, don’t despair! Contact us to speak with a member of our team for a personalized solution.
Last updated Mar 27, 2026
How to solve problems preventing your mechanical drill from working properly
There’s nothing more frustrating than your mechanical earth drill not performing the way you want it to. For more than 50 years, Little Beaver earth drills have been the #1 choice of rental store owners, fencing contractors and other professionals who want a one-man auger that’s safe and simple to operate. We’re dedicated to your success and have an extensive list of FAQs to address operation and maintenance questions. Check out solutions to some of the most common questions we receive about operating our mechanical earth drills.
The Drill Doesn’t Start
If you’re having trouble starting your mechanical earth drill and you’ve checked the fuel levels, there are a couple things you can try to get it working properly.
We incorporate an engine kill switch on the operating handles to allow quick fingertip control of the shut off for both safety and convenience. Often overlooked, this switch can be the culprit and an easy fix to a drill that will not start. There is also a switch incorporated in the torque tube bracket that will prevent the unit from running unless the torque tube is installed. This switch provides added safety and operator protection.
If the switch isn’t the culprit, take a moment to inspect your spark plugs. Clear indications that the spark plugs need to be changed include an engine that misfires, surges or consumes significant fuel. While you’re at it, we also recommend checking the engine oil. Although the engine has an alert that prevents operation when levels are too low, proactively checking the levels can save time and avoid hassle in the future.
Getting an Auger “Unstuck”
Occasionally, when drilling, you may encounter soils or circumstances that prove challenging for even the most powerful drills. If your auger is stuck in the ground, disconnect the handle/gearbox. Then use a pipe wrench on top of the auger to turn it in a counter clockwise direction. Be very careful not to damage the auger top.
If the pipe wrench is not successful, we do offer a specially designed tool for this situation. Part #9022-T is a Tee Handle. This handle is used in place of the pipe wrench for added leverage. You can order a Tee Handle by calling 936-327-3121.
To prevent this situation in the future, make sure not to push down on the auger when digging in soft clay or sandy soil. Let the drill do the work to efficiently cut its way through the soil.
Getting the Auger to Turn When the Engine is On
If your engine runs but the auger doesn’t turn, a problem with the drive train is the most likely situation. Frequently, the issue can be traced back to the flexible shaft core. The best way to determine if the flex shaft is the issue is to inspect the core end fittings for cracks or breakage. If the flex shaft core appears to be undamaged, check the key on the clutch drum, the gears or shaft keys within the gearbox and the adapter key on the gearbox output shaft for signs of damage.
If you find damage to the flex shaft or an issue with the gearbox, get in touch with our team to get the necessary repair parts and tips on how to prevent future damage. If both look fine but the auger still doesn’t turn, contact us or check your maintenance manual for further information on this issue.
Keeping the Auger Still When Not Engaged
If your auger turns all the time – even when not engaged – try adjusting the engine idle. If you’re unable to adjust to a low enough level to prevent turning when not engaged, replace the springs on your centrifugal clutch. To get the replacement springs and any tips on how to install them, contact us at 936-327-3121.
When an auger is working properly, the springs in the centrifugal clutch adjust when the auger is engaged so the clutch shoes push back and forth against the clutch housing to propel the auger. When not engaged, the clutch shoes stay still, so the auger stops turning. As the springs wear down, they loosen so the clutch shoes always pulse against the clutch housing.
To help reduce wear on the springs, make sure not to “bog down” the engine when using the drill. It’s important to let the auger turn fast enough that the clutch doesn’t slip because excessive slippage will cause overheating and loss of temper of the springs.
If you’re still not finding what you’re looking for, take a deeper look into our service FAQs for mechanical earth drills or check out our owner’s manual. If the answer to your problem still isn’t coming up, don’t despair! Contact us to speak with a member of our team for a personalized solution.

Last updated Mar 27, 2026
Factors to Consider When Addressing Wear Issues
Nothing ruins productivity like a broken piece of equipment. While that statement may seem fairly obvious, the actions to address problems are not always clear cut. Depending on the severity of the issue, you may be able to get away with a quick fix or repair to extend the life of the machine. But for larger issues, a full replacement might make more sense.
This logic holds true with earth drills just as much as any other piece of equipment in your fleet. There are many working parts to a drill, and while issues aren’t a common occurrence, they certainly can happen. Unfortunately, there is not a guide or rule book to tell you exactly when to repair and when to replace your earth drill. But with a bit of guidance and the help of an expert manufacturer, your decision may be a little easier.
Here are some factors to consider when repairing or replacing your earth drill:
What seems to be the issue?
Some of the most common earth drill issues include an auger that quits turning or turns when it’s not supposed to. If your auger spins while it’s out of the ground but quits spinning as soon as you start to drill the hole, it’s likely a broken flex shaft. The flex shaft should be cleaned and greased after every 50 hours of operation, but sometimes even routine maintenance can’t prevent breakage. A broken flex shaft can’t be repaired, and usually costs about $600 for the part and up to $100 for installation. In some cases, just replacing the inner core will fix the problem for around $200.
Gearbox issues are a different story. An issue with the gears or the gearbox prevents the drill from spinning altogether. While low motor oil can cause the motor to lock up and cease functioning, there’s also the possibility of a larger issue, such as the gears being stripped. Gearboxes can be repaired, but can cost nearly as much as a full replacement – a comparison of about $725 to repair or $850 plus installation costs to replace.
If the auger spins at idle, the diagnosis is likely the clutch. The auger shouldn’t spin until you depress the throttle and engage the clutch. If the clutch is overheated during operation, the heat-treated springs will no longer keep the shoes from engaging, causing the auger to stay engaged at all times. Similar to the gearbox, the repair cost nears the full replacement cost – a comparison of about $140 and $160 plus installation costs for a new clutch.
If the auger vibrates excessively or “walks” during use, it is likely due to misalignment or wear of the points and blades. Blades should be replaced when worn flush of the auger flighting. If the blades wear into the auger flighting, the auger will need to be repaired or replaced. Points should be replaced when the split or fork in the tip is less than ¼” from the bottom of the split.
What would a replacement part cost?
The cost of parts varies among manufacturers. A general statement of advice is that if the replacement parts cost more than 50% of a new drill, it might be best to invest in a new unit. Keep in mind though, don’t just look at the sticker price. You should also include the labor and cost of lost production, as well as the age of the equipment.
Common replacement parts like the flex shaft and the gearbox can add up to a significant dollar amount. In fact, if both need to be repaired at the same time, it can cost almost 50% of a new drill. While it’s not common for these two parts to break at the same time, it can happen if an operator hits an obstacle while digging at a fast speed.
If two or more parts need to be replaced at the same time, you may be better off replacing the entire drill. However, making the repairs and rebuilds yourself can be a more financially feasible option for those with the experience and tools to do so.
Can you fix it yourself?
Hiring someone to fix your equipment is often a logical choice, as it alleviates the effort required on your part. However, when you take this route, it’s important to factor in repair costs and time that is outside of your control.
The alternative – fixing it yourself – doesn’t have to seem like a daunting undertaking. Many manufacturers have resources to walk you through the process. Little Beaver offers service videos that address common repairs and maintenance questions. It might seem tempting to pay someone to fix your drill, but educating yourself on the components and repair process can save you time and money in the long run. If someone on your staff is mechanically inclined, they should be able to tackle the repairs.
In what application do you use the drill?
If you’ve got backup drills in your fleet, waiting for a repair might not be an issue. But for contractors who rely on the unit on a daily or even weekly basis, being without it could result in lost revenue. In the summer, especially, many local lawn and garden repair shops are backed up for 6-12 weeks, which is not a feasible wait time for many people. Depending on how long you’ve owned the machine and what industry you’re in, the decision to repair or replace might make more sense.
Rental
In the rental industry, only drills that operate bring in revenue. So if repairing a drill would take time, replacing it might be a better option. If time is the greatest concern, consider purchasing a second unit as a back-up and additional revenue source until the original drill is fixed.
In the rental industry, appearance of equipment is a large deciding factor for customers. Replacing a worn-out drill with a shiny new one might make more sense for the fleet. If turning inventory is on an annual or 18-month requirement, the chances are low that something would go wrong and require a full replacement before that time. In other instances, a rental center might repair a drill for 20 years. The criteria is different for each business, so make sure the cost and the results make sense for your store.
Fencing
In the fencing industry, it’s important to have a large enough fleet to change out drills if one needs repairs. Fencing contractors likely have more than one drill in their lineup, so taking one out of commission to get it repaired shouldn’t affect productivity. For many contractors, incremental costs broken up monthly are a more feasible option than a single, larger payment. But, it’s important to consider the cost of each of those repairs. Consider the overall age of the drill and how many key components could be showing that age.
What is the age and condition of the drill?
If a drill is maintained well and taken care of, it should last many years. There’s no rule that says “after 10 years or 10,000 hours of use, the motor will go out,” so it’s important to keep an eye on the machine. If a drill is rented out and used for 20 hours a week, it would likely require less maintenance than a fencing contractor who uses the drill 40 hours a week.
When considering repairing or replacing your drill, you’ll want to consider the overall health of the engine. If the engine is older and experiencing issues, replacement might be more logical however, if the engine is a rebuilt system and virtually like new, repair makes more sense.
Making a decision
If you suspect something is wrong with your drill, address it right away. If issues aren’t fixed in a timely manner, they can have a domino effect and create more damage. Taking care of one component right away can save time and hassle and prevent other issues.
Also, it’s important to remember that if you decide to purchase a brand-new drill, keep your old one on hand for replacement parts. Over time, it might be a good idea to fix up the old drill to use as a backup, too.
It’s hard to provide a cut-and-dry guide to repairing or replacing your equipment. The manufacturer can likely provide advice on your particular situation, so give them a call if you need help with the decision. Addressing problems and repairing or replacing your earth drill will help bring your operation back to maximum productivity.
Last updated Mar 27, 2026
Preparing Your Drill for Off-Season Storage
As the end of the busy season wraps up, it’s time to take a closer look at your mechanical earth drill. When it comes to a smooth drilling operation, it’s a matter of a well-operating machine. Yes, choosing a top-performing, reputable drill manufacturer plays a huge role in the success of your drill, but performing routine and end-of-season maintenance is important to prolong the life of your equipment, and ensuring it performs when you really need it.
Routine drill maintenance includes examining, cleaning and lubricating key drill components roughly every 30 days or 40 hours of operation. But what happens at the end of busy season, when your drill makes its way to storage for a few months? Whether owner or a rental center, there are a few steps you can take to ensure a simple transition from storage to usage in the spring.
Inspect the drill
After every use of your earth drill, take a look at all of the components to ensure everything is in working order. End-of-season maintenance includes taking that inspection one step further. Make sure the blades are past the flighting. When the blades start to wear flush with the auger, it’s time to flip the blades or replace them. If the blades wear to the auger flighting and wear the actual flighting, operators will either need to repair the auger flighting or replace the entire auger.
Take a few more steps to complete the detailed inspection. Ensure all bolts are tight, and make sure all carbide blades (used for hard clay, frozen ground, or hard pan soils) are sharp. If the carbide blades feel worn and rounded, sharpen them with a bench grinder. Using a silicone carbide bench grinding wheel, hold the blade at a 5- to 7-degree relief angle to sharpen it.
The push button connector should be in good shape, with no visible rust. Check the throttle lever for damage or wear. Inspect the throttle cable, too. When you pull the lever, the cable should move freely on the other end. If it sticks, replace it. Some users might be able to remove the cable, clean it and reattach, but if the cable is frayed at all it will be difficult to get back in. Replacing is often the best option.
Inspecting your drill’s flex shaft should be done two or three times a year, but is especially important during end of year maintenance. There shouldn’t be any cracks or wires on the outer housing. If it’s in good shape, simply remove the core, clean it, re-lube it and slide it back in. If the flex shaft shows signs of cracks or wires, it should be replaced.
If any parts are in need of replacement, contact Little Beaver. Addressing replacement parts prior to storage is a better alternative to waiting until spring. Store your drill with peace of mind knowing it’ll be ready to operate in the spring, rather than dealing with potential delays waiting for parts.
Replace fluids and filters
Transmission fluid should be replaced regularly. If your fluid has a lot of metal shavings in it, that can be an indication of excessive gear wear or missing teeth. If the fluid is changed regularly, you won’t experience gear wear. If you hold the output shaft and wiggle it, you shouldn’t feel a lot of movement.
Motor oil and filters should be cleaned and changed. Clean filters with an air hose, or if they’re foam filters they can be shaken out.
Clean and prep for storage
Considering the job, it’s natural that earth drills get dirty. Dirt and clay adhere to the blades of the auger, which can diminish the efficiency and performance of the equipment. Not only should your machine be wiped down after every use, it should also undergo a deep cleaning during end of year maintenance.
Remove all debris from the earth blades using warm, soapy water. Avoid using a power washer, as the pressure can damage the equipment.
To prep for storage, disassemble the drill and remove the torque tube and auger. Drain the fuel or add fuel neutralizer before storage.
Always store the drills upright in a dry place because the steel components will eventually rust if left outside or in places with a lot of moisture, such as propped up outside against a building.
Keep in mind the importance of end-of-year maintenance and the role it plays in overall lifespan of the drill. Cleaning and storing the machine properly contributes to the continued success of your drilling operation.
If you have a maintenance issue or question, make sure to reference Little Beaver’s online parts and operators’ manual, online service videos or contact us for in-house technical consultation.

Last updated Mar 27, 2026
Tips For Preventing and Diagnosing Mechanical Earth Drills Issues
Mechanical drills’ high operating speeds and compact sizes make them a popular choice for contractors and rental centers — and ideal for drilling holes quickly. Although these transmission-powered machines have significantly more moving parts than their more costly hydraulic counterparts, simple knowledge of how to prevent and diagnose common problems will keep your drill running efficiently. Below are answers to questions we get often and some tips to help you achieve better ROI.
What steps can I take to minimize the risk of damaging the drill?
Start by choosing a unit with the correct gear ratio and auger for your soil. For soil with minimal rocks and few roots, a 10:1 gear ratio with a standard auger will provide fast and efficient results. For drilling in clay or other difficult conditions, a 10:1 gear ratio will still work, but switch from a standard to carbide blade to effectively cut through the soil. If you’re working in an area with rocks exceeding 3 inches in diameter, choose a drill with a 20:1 gear ratio reduction and a heavy-duty auger. The gear reduction slows the auger from 360 to 180 rpm and will pop the rocks out of the soil and continue spinning.
Should I be concerned that the gearbox is hot or making an unusual sound?
The gearbox will always be hot to the touch when the drill is operating. However, if the transmission is extremely hot, smells like burned oil or starts making unusual sounds, check the oil level. Oil leaks can occur around the seal, lower output shaft or the top of the transmission, and will lead to drill damage if ignored. Low oil also increases the risk of premature bearing wear, which can result in excessive heat and unusual sounds. To prevent early wear, check the transmission oil level and condition monthly or every 40 hours of operation.
The engine is running, so why won’t the auger turn?
A problem with the drivetrain, most likely along the flexible drive shaft, is to blame. To pinpoint the issue, start by inspecting the end fittings for cracks or breaks. If there are broken wires or sharp kinks, it’s time to replace the shaft housing. If things appear fine from the outside, remove the flex shaft for further inspection. To prevent flex shaft damage, clean, examine and grease the flex shaft every 50 hours of operation. Check your owner’s manual to determine the correct procedure for greasing the flex shaft.
Why does the clutch slip or cause the drill to jerk during operation?
Over time, a drill’s clutch padding wears, resulting in reduced performance when engaging the auger or accelerating the engine from idle to full speed. The clutch will continue to run, even if the padding is completely gone, leading to easily detectable problems. It’s best to inspect the clutch every 30 days or any time you lubricate the flexible drive shaft. Regular checks will help you track the wear so you can replace the clutch pads before the drill loses performance.
Why is the drill less efficient than it used to be despite everything working properly?
Too often, operators allow the points and blades to wear beyond the point of being effective. The drill can run perfectly and spin all day, but if the blades and points are worn, the unit will become less and less effective.
Where can I find additional resources?
Information is always available at your fingertips, including comprehensive maintenance brochures and video tutorials. These helpful tools are excellent resources and often include visuals as well as step-by-step instructions.
Knowing your drill, keeping up with maintenance and accessing additional resources when questions arise will go a long way toward successful drilling.