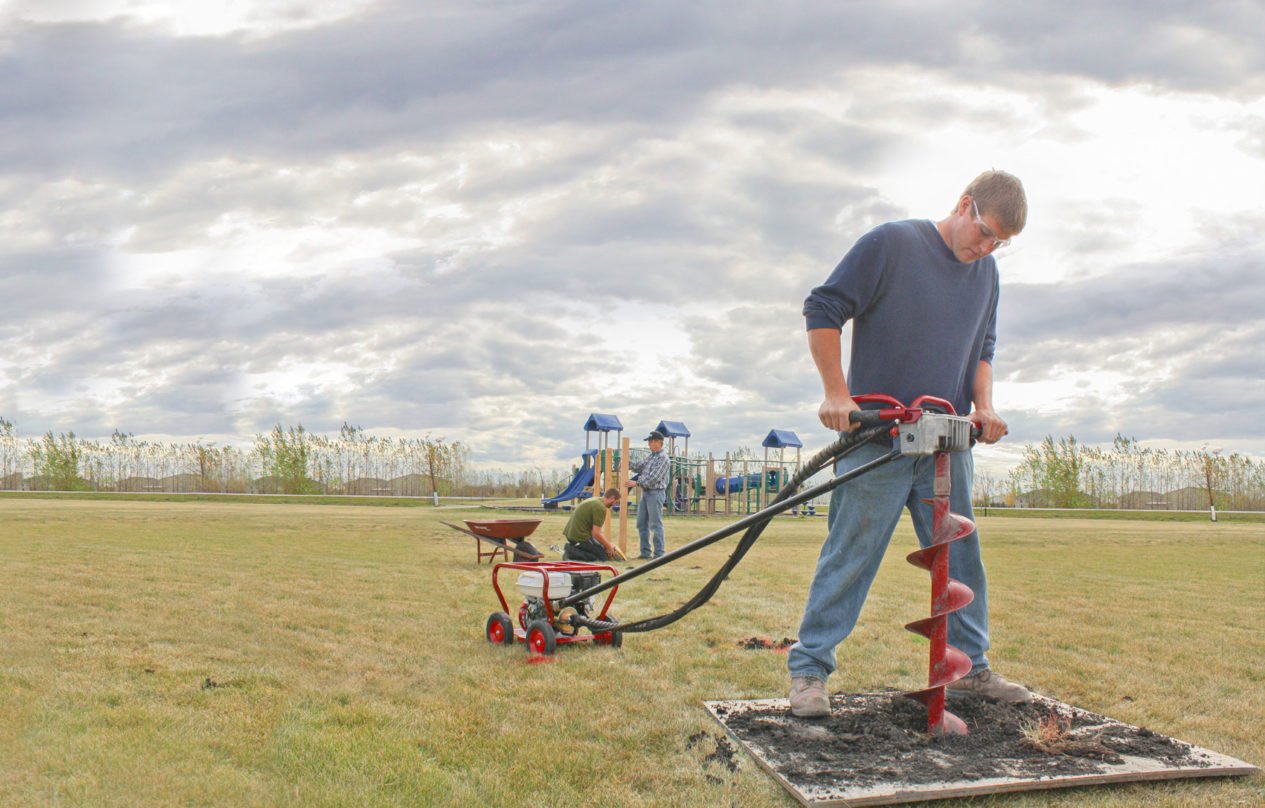
Fencing contractors have come to rely on high-speed mechanical earth drills for quick hole digging — and for good reason. These powerful machines greatly increase productivity over manual methods, improving profits and ROI. However, some efficiency is lost on increased labor costs and safety concerns directly resulting from the brute force these machines employ. Some companies — like Little Beaver — have made improvements to the design to allow a single operator to drill safely, saving time, labor costs and reducing the possibility of injury to the operator and damage to the machine.
Torque Transfer
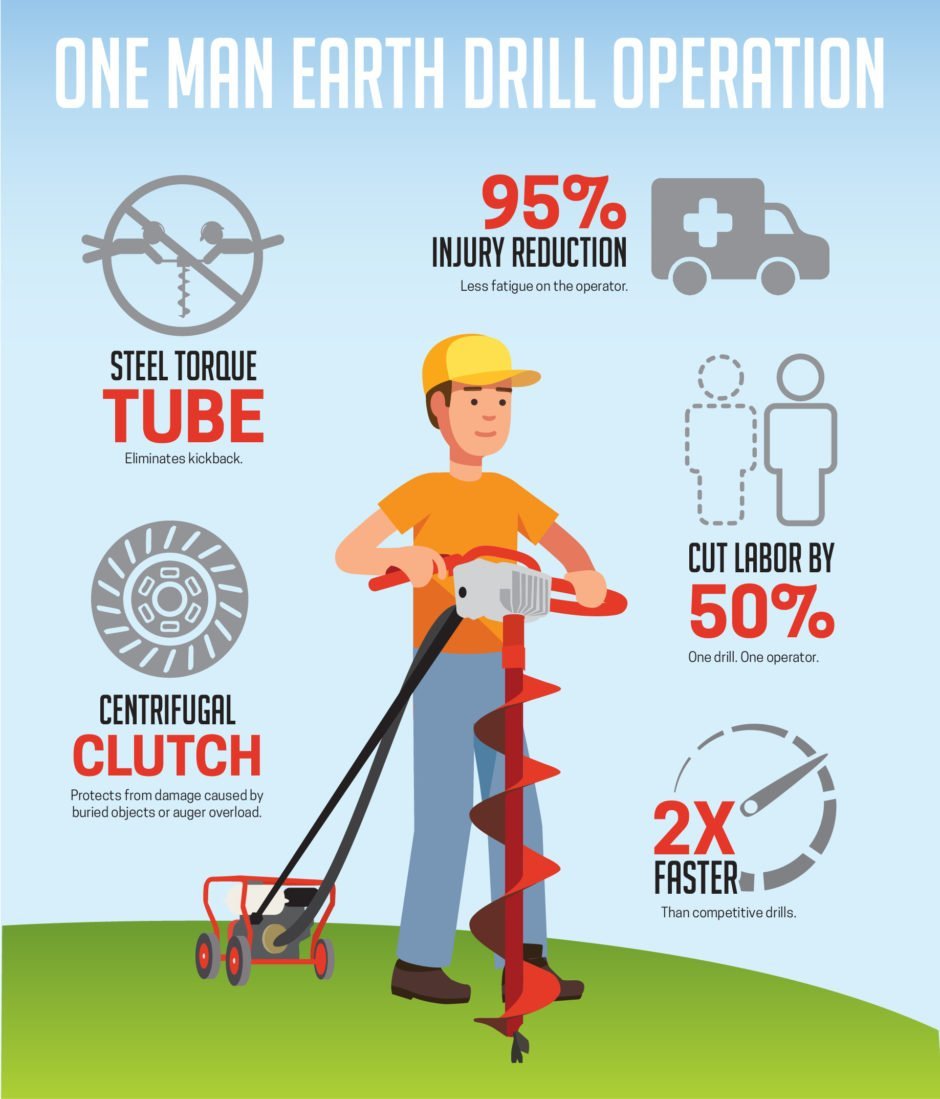
One-man drilling leaves the torque generated from a mechanical drill operating at 360 rpm in the hands of one person, a dangerous and potentially costly situation that can leave workers injured, jobs unfinished and insurance claims to be filed. It’s why Little Beaver builds its mechanical drills standard with steel torque tubes to prevent such situations from spinning out of control.
The steel torque tube transfers auger torque and kickback to a separate engine carriage instead of the drill’s handles. Little Beaver makes this possible by mounting the engine on a separate carriage and then connecting the engine to the drill via the torque tube. This makes one-man drilling a safe and efficient reality instead of a potential hazard.
But what happens when the kickback proves too much for the drill?
Centrifugal Clutch
Fence installers know the frustration of hitting tough objects, like roots or rocks, that can abruptly halt drilling at the expense of the operator or the drill itself. Quick changes in torque when drilling can destroy a transmission as easily as it can a shoulder. A centrifugal clutch helps to alleviate these hazards and headaches.
As the torque tube mitigates operator risk by reverting the torque back to the engine carriage, the drill’s transmission now takes on the risk of overloading from all the torque and drilling pressure or damage from encountering a buried object. This is where the centrifugal clutch kicks in. A drill equipped with a centrifugal clutch will automatically slip if it becomes overloaded or strikes an object that cannot be readily drilled through. Pairing this feature with a heavy-duty transmission limits the chances for auger and transmission damage or an untimely breakdown.
A centrifugal clutch, along with the steel torque tube, brings repair cost mitigation and safety maximization full circle. The increased safety of the operator combined with one-man operation and the decreased likelihood of a breakdown equals a smaller and more efficient crew that can take on more jobs.
Intuitive Design
Intuitive design leads to fluid operation. A drill operator shouldn’t need to waste time or focus searching for a switch or changing a cumbersome attachment. Time saving features like snap-on augers and handle-mounted on/off switches on Little Beaver drills help to improve operation, increasing efficiency and potentially saving the operator and machine from unnecessary harm.
There is no formula for increasing the number of jobs completed while decreasing labor input. Such a conundrum takes technological advances to overcome, and Little Beaver has done just that. Fencing crews can now complete jobs with less labor, freeing up time and budget to tackle more work safely.
Nothing ruins productivity like a broken piece of equipment. While that statement may seem fairly obvious, the actions to address problems are not always clear cut. Depending on the severity of the issue, you may be able to get away with a quick fix or repair to extend the life of the machine. But for larger issues, a full replacement might make more sense.
This logic holds true with earth drills just as much as any other piece of equipment in your fleet. There are many working parts to a drill, and while issues aren’t a common occurrence, they certainly can happen. Unfortunately, there is not a guide or rule book to tell you exactly when to repair and when to replace your earth drill. But with a bit of guidance and the help of an expert manufacturer, your decision may be a little easier.
Here are some factors to consider when repairing or replacing your earth drill:
What seems to be the issue?
Some of the most common earth drill issues include an auger that quits turning or turns when it’s not supposed to. If your auger spins while it’s out of the ground but quits spinning as soon as you start to drill the hole, it’s likely a broken flex shaft. The flex shaft should be cleaned and greased after every 50 hours of operation, but sometimes even routine maintenance can’t prevent breakage. A broken flex shaft can’t be repaired, and usually costs about $600 for the part and up to $100 for installation. In some cases, just replacing the inner core will fix the problem for around $200.
Gearbox issues are a different story. An issue with the gears or the gearbox prevents the drill from spinning altogether. While low motor oil can cause the motor to lock up and cease functioning, there’s also the possibility of a larger issue, such as the gears being stripped. Gearboxes can be repaired, but can cost nearly as much as a full replacement – a comparison of about $725 to repair or $850 plus installation costs to replace.
If the auger spins at idle, the diagnosis is likely the clutch. The auger shouldn’t spin until you depress the throttle and engage the clutch. If the clutch is overheated during operation, the heat-treated springs will no longer keep the shoes from engaging, causing the auger to stay engaged at all times. Similar to the gearbox, the repair cost nears the full replacement cost – a comparison of about $140 and $160 plus installation costs for a new clutch.
If the auger vibrates excessively or “walks” during use, it is likely due to misalignment or wear of the points and blades. Blades should be replaced when worn flush of the auger flighting. If the blades wear into the auger flighting, the auger will need to be repaired or replaced. Points should be replaced when the split or fork in the tip is less than ¼” from the bottom of the split.
What would a replacement part cost?
The cost of parts varies among manufacturers. A general statement of advice is that if the replacement parts cost more than 50% of a new drill, it might be best to invest in a new unit. Keep in mind though, don’t just look at the sticker price. You should also include the labor and cost of lost production, as well as the age of the equipment.
Common replacement parts like the flex shaft and the gearbox can add up to a significant dollar amount. In fact, if both need to be repaired at the same time, it can cost almost 50% of a new drill. While it’s not common for these two parts to break at the same time, it can happen if an operator hits an obstacle while digging at a fast speed.
If two or more parts need to be replaced at the same time, you may be better off replacing the entire drill. However, making the repairs and rebuilds yourself can be a more financially feasible option for those with the experience and tools to do so.
Can you fix it yourself?
Hiring someone to fix your equipment is often a logical choice, as it alleviates the effort required on your part. However, when you take this route, it’s important to factor in repair costs and time that is outside of your control.
The alternative – fixing it yourself – doesn’t have to seem like a daunting undertaking. Many manufacturers have resources to walk you through the process. Little Beaver offers service videos that address common repairs and maintenance questions. It might seem tempting to pay someone to fix your drill, but educating yourself on the components and repair process can save you time and money in the long run. If someone on your staff is mechanically inclined, they should be able to tackle the repairs.
In what application do you use the drill?
If you’ve got backup drills in your fleet, waiting for a repair might not be an issue. But for contractors who rely on the unit on a daily or even weekly basis, being without it could result in lost revenue. In the summer, especially, many local lawn and garden repair shops are backed up for 6-12 weeks, which is not a feasible wait time for many people. Depending on how long you’ve owned the machine and what industry you’re in, the decision to repair or replace might make more sense.
Rental
In the rental industry, only drills that operate bring in revenue. So if repairing a drill would take time, replacing it might be a better option. If time is the greatest concern, consider purchasing a second unit as a back-up and additional revenue source until the original drill is fixed.
In the rental industry, appearance of equipment is a large deciding factor for customers. Replacing a worn-out drill with a shiny new one might make more sense for the fleet. If turning inventory is on an annual or 18-month requirement, the chances are low that something would go wrong and require a full replacement before that time. In other instances, a rental center might repair a drill for 20 years. The criteria is different for each business, so make sure the cost and the results make sense for your store.
Fencing
In the fencing industry, it’s important to have a large enough fleet to change out drills if one needs repairs. Fencing contractors likely have more than one drill in their lineup, so taking one out of commission to get it repaired shouldn’t affect productivity. For many contractors, incremental costs broken up monthly are a more feasible option than a single, larger payment. But, it’s important to consider the cost of each of those repairs. Consider the overall age of the drill and how many key components could be showing that age.
What is the age and condition of the drill?
If a drill is maintained well and taken care of, it should last many years. There’s no rule that says “after 10 years or 10,000 hours of use, the motor will go out,” so it’s important to keep an eye on the machine. If a drill is rented out and used for 20 hours a week, it would likely require less maintenance than a fencing contractor who uses the drill 40 hours a week.
When considering repairing or replacing your drill, you’ll want to consider the overall health of the engine. If the engine is older and experiencing issues, replacement might be more logical however, if the engine is a rebuilt system and virtually like new, repair makes more sense.
Making a decision
If you suspect something is wrong with your drill, address it right away. If issues aren’t fixed in a timely manner, they can have a domino effect and create more damage. Taking care of one component right away can save time and hassle and prevent other issues.
Also, it’s important to remember that if you decide to purchase a brand-new drill, keep your old one on hand for replacement parts. Over time, it might be a good idea to fix up the old drill to use as a backup, too.
It’s hard to provide a cut-and-dry guide to repairing or replacing your equipment. The manufacturer can likely provide advice on your particular situation, so give them a call if you need help with the decision. Addressing problems and repairing or replacing your earth drill will help bring your operation back to maximum productivity.
When homeowners make a plan for a curb appeal upgrade, there is often a lot of discussion about what is necessary and which ideas are practical. Having the proper tools for any home improvement project is crucial for its success. Since curb appeal is so important for home value, homeowners want to be sure they can do it right the first time. Here are a few tips (and tools) that ensure greater accuracy and make the whole project easier.
Why Every Home Needs Curb Appeal
Although some homeowners do not think about curb appeal until they want to sell a home, many choose to maintain or improve their exterior systematically over time.
The view of the home in relation to other homes in the neighborhood is what makes up what is called, “curb appeal.” Why does one home look better than others on the block? Curb appeal is a vital part of the home’s overall value. Even if homeowners have just moved in and do not plan to sell for many years, preserving home value should always be on their minds. They may need it if they want to refinance their mortgages, get a home equity loan for other improvements, or sell the home unexpectedly.
Here are two high-impact improvements to consider when looking to boost a home’s curb appeal:
Highlighting With Landscape & Outdoor Recreational Lighting
There are many things that homeowners can do for their properties to accentuate the wonderful aspects that are already there. Lighting is a good example. Landscape lighting is an excellent way to make the perfect look for the property at night. Lighting can also be used for outdoor recreational lighting to entertain guests or simply enjoy a change of scenery at night.
Of course, installing lighting outside often involves digging the electrical lines for the lighting. Doing this by hand, homeowners could spend hours putting strain on their backs digging down 6 to 12 inches so that they can install their sidewalk lighting. Alternatively, they could use a Little Beaver Kwik-Trench mini-trencher to save their backs and a great deal of time. The Kwik-Trench allows homeowners to:
set the perfect depth for the trench
move at a rapid pace
reach spots that a larger trencher cannot access
Installing landscape lighting should not have to be a task that takes days or weeks. With this tool, the job will be done much more quickly.
Building the Ideal Perimeter Fence
Curb appeal concerns more than just the home and garden. That is why homeowners often look for ways to create attractive fencing or barriers surrounding the edges of the property. When homeowners need to install trees, vegetation or fences, they usually need to drill or dig using an auger. The best augers make it simple for people to dig a hole through any type of soil, of any width and a variety of depths. Snap-on augers offer exactly what homeowners need, with a design that is practical for almost anyone to use.
Planning Into the Future
Homeowners may be surprised with just how many projects they can accomplish with the right tools. Homeowners who used a trencher to install lighting might decide to call on it again to build a new garden, or change up their landscaping design. An auger with removable blades is a useful implement to keep on hand for landscape maintenance and other digging projects.
Building curb appeal for a home is less a single task than it is a state of mind. Taking advantage of tools that simplify the work allows people to ensure their homes look great every year without wasting time or effort. When homeowners use the right tools it creates the opportunity to do much more, both inside and outside the home.
Little Beaver Earth Drills are designed to be safely operated by just one person. What does that mean for your business? More efficient labor utilization. Faster job completion. Fewer injuries. More profit on every job.
Check out the infographic below to learn how Little Beaver Earth Drills can double your productivity and maximize jobsite safety.
Learn how to properly set up the Little Beaver mechanical earth drill for fast success starting your projects, whether it’s installing a fence, building a deck or planting a row of trees. Follow along as Randy VanWagner, our engineering manager, demonstrates the step-by-step process for setting up the drill as well as disassembling it for transportation or storage.
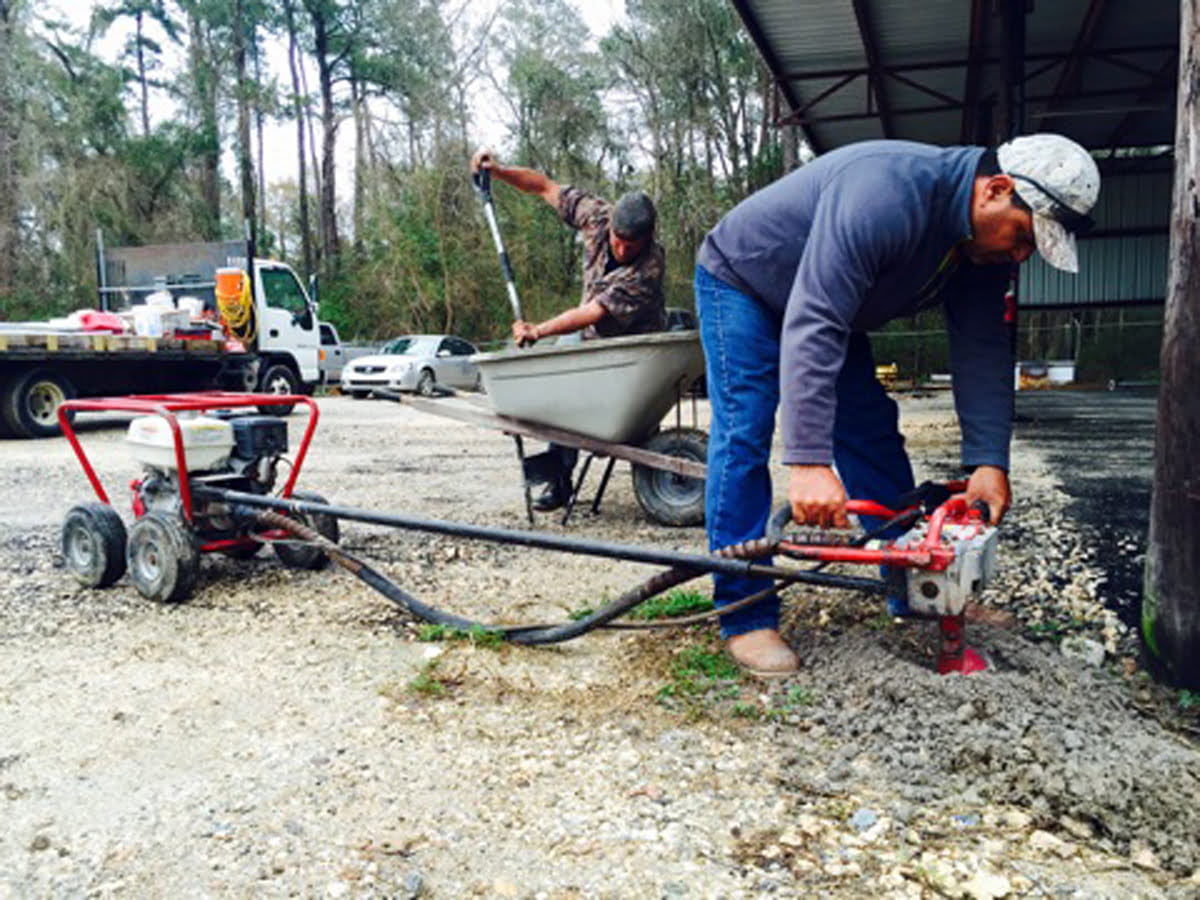
Fencing Company Always Ready to Fight Back with Mechanical Earth Drills
It was a crushing one-two combination. In the fall of 2005, Hurricanes Katrina and Rita beat down the Gulf Coast within weeks of each other, leaving splinters of devastation in the wake of their Category 5 forces.
It didn’t take long after the floodwaters receded from New Orleans and surrounding communities for the phone to start ringing at Hercules Fence. One call became a deluge, and for the next three years the fence replacement jobs kept the Lake Charles, Louisiana company working nearly double-time days, with their mechanical earth drills setting thousands of holes. Company owner Charles Harris never appreciated their dependability, power and versatility more than he did in the aftermath of the storms.
Six Decades of Posts
Hercules is a family-owned business that has been installing fences for more than 60 years. There was a time when the work suited the name: crew members dug all the holes by hand, muscling through the toughest soils with manual augers. But for nearly five decades now, Little Beaver mechanical earth drills have been driving the company’s installations because of the drills’ power, reliability and safety. Today, Hercules owns three MDL-8H mechanical drills and uses them for chain link, ornamental, wood and vinyl fences on residential and commercial projects. They’re the most efficient option for bread-and-butter jobs that cover 200-600 feet of fence with 30-60 holes that are 3 feet deep.
Hercules does more expansive commercial and industrial projects, too, installations as long as 25,000 feet that require as many as 2,500 holes up to 12 inches in diameter and 42 inches deep. Because of the sheer scope of the jobs, the crew uses a skid steer equipped with a drill to do the bulk of the digging work. Even for those larger and more challenging projects, the small but mighty Little Beaver machines never get left behind. That’s because for areas with soft soils, a skid steer may get stuck but a couple of workers can get in with a mechanical drill, do the work and get out again.
Workers Use Drills With Skills While Putting Others First
Because of the tremendous amount of devastation from sister hurricanes, Hercules Fence once again turned to the Little Beaver to help them quickly complete the many landscaping projects on their list. The destruction started with Hurricane Katrina, which not only destroyed businesses, homes and infrastructure in the area; it also took out nearly every fence. Making an already horrible situation worse, Rita blew through a couple of weeks later adding to the destruction, even claiming Harris’ own house.
Despite their own devastating losses, Harris and his crew members helped others rebuild. Over the year and a half following Rita, they replaced fences that provided hard-hit residents and companies with the extra measure of privacy and security they’d lost. It was a huge undertaking, but day in and day out, the crew of three men put all three of their Little Beaver drills to work.
The highly efficient Little Beaver drills rotate at up to 360 rpm to quickly bring spoil to the surface and leave clean holes. The fast operation allowed the Hercules crew to work quickly so they could complete as many projects as possible each day. And with the torque tube, one person could safely operate each drill, even when digging with large diameter augers, without getting fatigue from drill kickback.
Hercules and their drills were again put to the test almost three years to the day after Rita roared through, when Hurricane Ike pounded the Lake Charles area. It took more than a year, but once again the Hercules crew worked long days to restore the area’s fences.
Since then the workday hours have backed down to their normal eight, and Harris found the time to rebuild in Lake Charles. The threat of a hurricane will be there every year. But if and when the next hurricane throws some punches, Hercules will be there, armed with Little Beaver mechanical earth drills to sink the holes and put the pieces back together.
We use cookies to ensure that we give you the best experience on our website. If you continue to use this site we will assume that you are happy with it.