Last updated Mar 27, 2026
Optimize Your Earth Drill with Little Beaver
There are a lot of factors to consider when purchasing an earth drill. While some features may seem like mere details, the effect on productivity can be significant depending on soil types and applications. At Little Beaver, we offer a variety of customizable earth drill features to maximize drilling performance for each application.
Below, we explain some of our most common drill considerations.
Mechanical vs. Hydraulic
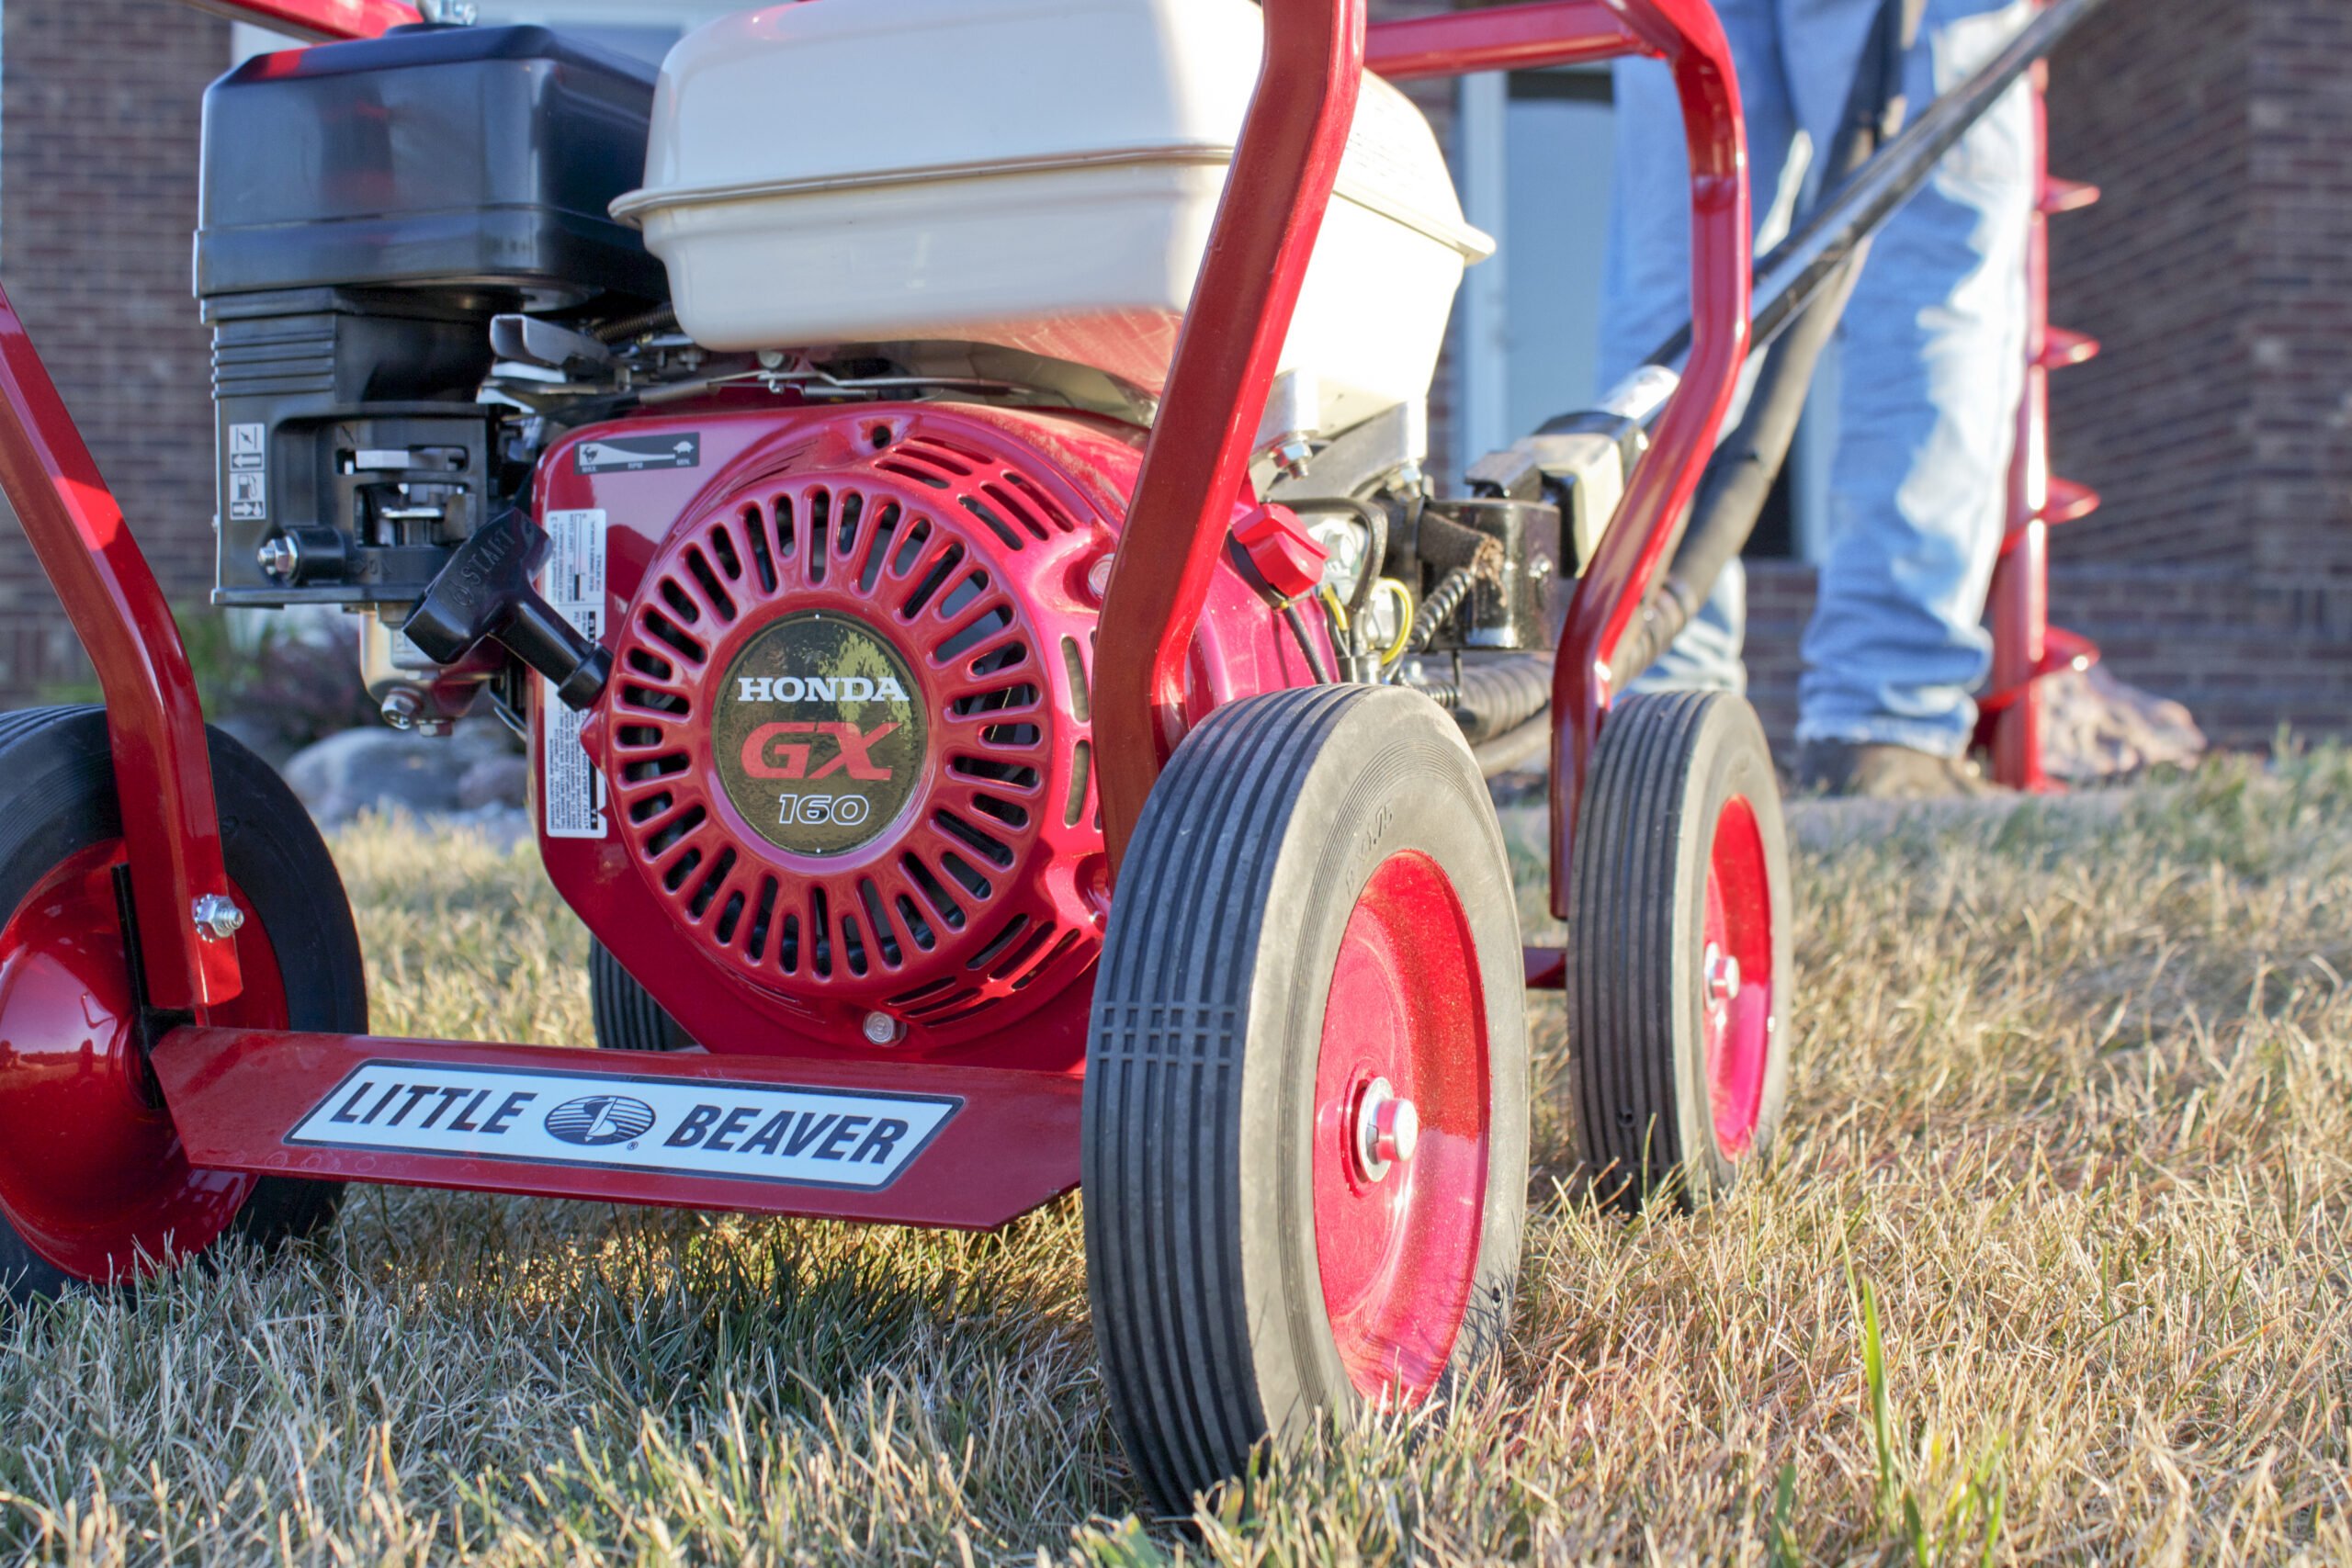
The first step in purchasing an earth drill is deciding between mechanical or hydraulic power. Your drill’s power source influences drilling strength, depth, attachment options and more. Knowing which projects you plan to tackle allows you to choose the drill that works with the accessories and kits you’ll need.
The mechanical earth drill offers high-speed auger rotation to dig holes quickly and cleanly. These models have engines ranging from 5.5 horsepower to 8 horsepower, providing ample power for nearly any project. The mechanical earth drills have a standard gear ratio of 10:1 with the option to purchase a 20:1 or 13:1 gear ratio for applications that require more power at a lower speed. The compact size of our mechanical earth drill makes it great for residential fencing, sign installation, landscaping and other limited access construction projects. With optional wet and dry horizontal boring kits, the mechanical drill allows you to take on even more projects such as boring under sidewalks or driveways.
The hydraulic earth drill offers rugged durability for challenging soils and applications. With engines ranging from 10.7 horsepower to 21.5 horsepower, Little Beaver hydraulic models offer ample power for drilling through heavy clay or rocky soils. We recommend the hydraulic earth drill for industrial fencing, foundation pier holes and groundwater monitoring. The hydraulic drill features an optional anchoring kit to install mobile home and utility anchors quickly and efficiently.
Maneuverability
Our mechanical and hydraulic earth drills come with two different engine carriage options so you can choose the best way to move your drill through the jobsite. The standard option is the rolling wheel carriage that features semi-pneumatic or pneumatic tires with the optional addition of a roll cage.
For additional maneuverability, you can upgrade to a specially designed rick-sha carrier that features 20-inch semi-pneumatic wheels for navigating over rough terrain. A convenient pull handle and transmission cradle make it easy to smoothly move the earth drill to your exact drilling location.
Drilling Handle
Both the mechanical and hydraulic earth drills feature our innovative torque tube. This tube redirects the torque away from the drill by transferring kickback from the auger to the power source. Most drills without torque protection require two operators. However, because our earth drills come with the torque tube, the standard handle on our drills is the one-man handle.
Our hydraulic drills offer additional handle options: a two-man handle for drilling holes that are larger in diameter or extra deep, and the high-torque anchor handle for anchoring mobile homes or light utility work.
Work with a Pro
There are many factors to keep in mind when choosing your earth drill and the features that best fit your application. The good news is that Little Beaver staff is here to help. We have more than 60 years of experience in the earth drill manufacturing business, and we are qualified to help you choose the best drilling equipment for your project. Call us today to get started.

Last updated Mar 27, 2026
Utility Anchoring Adaptors Make Expanding Your Business Easy
Are you looking to dip your toes in the utility anchoring market? Maybe you’d like to start anchoring light poles or even commercial grade telephone poles? A utility anchoring adaptor expands the capabilities of our hydraulic earth drill so you can do more with your existing equipment. Little Beaver hydraulic earth drills paired with our utility anchoring system can anchor utilities faster and safer than traditional methods.
Traditional Utility Anchoring Options
Traditional utility anchoring methods rely on two different options: a high-speed, hand-held drill commonly known as an “anchor cranker” and installing the anchors by hand.
Hand anchoring requires a straight rod to screw the anchor into the ground using only the strength of crew members. Installation with this method averages one anchor per hour, a slow, physically demanding process that takes longer than other anchoring alternatives.
Anchor crankers, the other alternative, feature two large handles with a gas-powered, high-speed rotary unit and can only be operated safely with two people. This system is cumbersome and dangerous. Due to the machine’s torque and high rpm, if one operator happens to lose their grip, the other is typically unable to maintain control. In the event that both operators let go, the machine’s torque instantly transfers from driving the anchor into the ground to aggressively spinning the handles above the ground. Too often, the free-spinning metal will strike an operator, resulting in leg or other lower-body injuries.
Utility Anchoring Adaptors
At Little Beaver, we offer utility anchoring adaptors for our hydraulic earth drills. The adaptor connects the drill to the utility anchor for installation. We also offer a high-torque anchor handle for the hydraulic drill that generates 360 foot-pounds of torque at 60 RPM.
This setup brings the benefits of our torque tube to anchoring, eliminating dangerous kickback. It also expands crew members’ abilities to work faster. A single operator can install a utility anchor with a hydraulic earth drill in less than two minutes allowing for the completion of an entire pole in under an hour.
If the anchor hits something hard and becomes stuck, manually dislodging an anchor can take as long as 45 minutes, depending on the depth. Hydraulic drills, on the other hand, are equipped with reverse. If an anchor gets stuck, it can be backed out in seconds.
Our hydraulic earth drill paired with the anchoring system is perfect for limited access applications where larger equipment isn’t easily maneuvered. This is a good option for utility lines that are in residential areas or tucked behind buildings.
Beyond the safety feature of the torque tube, there are other health benefits to using our utility anchoring system. It reduces strain on the operator’s arms and hands by minimizing vibration. In turn, this reduces the potential for worker’s compensation claims and project delays due to injury or work time limits. It’s also a quieter alternative to gas-powered anchor cranker counterparts, helping to protect hearing.
Little Beaver utility anchoring adaptors allow you to take on utility anchoring projects quickly and safely. Contact us to learn about this and other attachments for your earth drill.

Last updated Mar 27, 2026
Utilizing a Mini-Trencher to Bury Dog Fence Wire
Wired electric dog fences are growing in popularity as a way to safely contain your dog without the hassle of installing a traditional fence. In addition to increasing curb appeal, electric dog fences work well for odd-shaped yards, create a stronger signal than wireless fences and can be easily expanded with the addition of more wire.
When it comes to installing electric dog fence wire, there are a variety of ways to do it. Instead of straining your back with manual installation methods, we recommend renting a mini-trencher like the Kwik-Trench to get the job done. Here are the steps to complete the work as easily as possible.
What You’ll Need:
- Dog fence containment system
- Kwik-Trench mini trencher
- Twisted wire
- Wire cutters
- An electric drill (optional)
- Splicing kits
- Shovel
Establish the Boundaries
Once you have everything you need, plan the boundary for your dog. Whether that’s sectioning out a dog-free area or laying boundaries in a large yard, it’s important to plan just how much access to give your dog. Make sure to check the manual that came with your electric dog fence during this step for any restrictions or local guidelines.
You’ll need to make note of a few areas to consider while establishing this boundary. The first is to find an electrical outlet where the transmitter box will be located. Many homeowners choose their garage or shed. The other area to mark is where you want your dog to be able to cross the wire safely, such as through doorways.
Create Crossing Points
To create points where your dog can cross safely, use a pair of wire cutters to snip the wire in the location you need. Make sure to also disconnect the wire from the transmitter box by removing the pin of wire. Then, take some twisted wire and twist it together with the dog fence wire so there is around one twist per inch of wire. A good rule of thumb is the more rotations the better. If you’re hoping to create a lot of cross points for your dog, using an electric drill for this step can make things easier.
Once the cross points have been twisted, splice the twisted wire and place it back inside the boundary loop. We suggest a splicer kit for this step to make the process easier. Then, connect the twisted wire to the transmitter box.
Time to Trench
It’s worth noting that some will try to staple the electric wire above ground for an easy solution, but this will shorten the lifespan of the wire when rodents, the dog or weather degrade the wire. It can also pose a tripping hazard or get caught in lawnmowers. A better solution is digging a trench to bury the wire, and renting a mini-trencher is both easier and more efficient than manual methods. Dog fence wire should be buried 3 to 5 inches below the ground. This is deep enough to protect the wire from animals and weather but shallow enough to maintain a strong signal.
To get started with a mini trencher like the Kwik-Trench, watch this helpful video for how to operate the machine. As the trencher is warming up, make sure to lock the swivel wheel to trench straight lines. Once the swivel lock is in place and the trencher is warmed up, use the manual crank control to adjust the cutting depth and simply push the trencher forward. With a mini-trencher like the Kwik-Trench, you can dig up to 30-feet of trench per minute. If your trench needs to follow curved lines in some areas, simply unlock the swivel wheel to easily move around small yards or hard-to-access areas.
Backfill it Up
Once the trench has been dug, place your dog fence wire inside and get ready to backfill. When using a Kwik-Trench, backfilling is easier than ever because the machine neatly deposits the soil right next to the trench so you can simply push it back in with a shovel. An added benefit of using a Kwik-Trench for burying dog fence wire is the pneumatic tires that won’t damage turf. This means after backfilling your trench, your job is complete – no additional clean-up necessary!
If you have any additional questions about how to dig a trench for an electric dog fence, don’t hesitate to reach out to your local rental center or a Little Beaver expert. We are happy to help make your project go as smoothly as possible!

Last updated Mar 27, 2026
How to Use a Kwik-Trench for DIY Projects
If you have a project that requires shallow trenching such as installing electric dog fencing, landscape edging or lawn sprinkler systems, you might be trying to determine the fastest way to dig a trench. Instead of using manual methods like drainage spades and trenching hoes, renting a mini-trencher like Little Beaver’s Kwik-Trench is an option to make do-it-yourself (DIY) trenching quicker and easier than ever. But before you make a trip to your nearest rental center, there are a few things to know about trenchers.
What is a Trencher?
A trencher is a type of earth-moving equipment that uses a metal chain or a wheel with steel teeth to rip into the ground. Trenchers come in a variety of sizes and models for applications ranging from installing electrical cables and drainage to landscape projects around the house.
Types of Landscape Trenchers
The trenchers used for landscaping are very different than the trenchers that are used for farming or utility trenching. While there are trencher attachments that can be combined with large machines or ride-on trenchers, there is also a whole class of landscaping trenchers which are perfect for DIY yard projects. These compact trenchers maximize features such as maneuverability and versatility. When reviewing the different types of landscape trenchers, it’s important to understand what each option offers so you can select the best trencher for the job.
Handheld Trenchers
These types of trenchers look like a chainsaw and can trench up to 16 to 27 inches deep, which makes them great for deeper landscaping projects. Renting a handheld trencher is less labor-intensive than using different types of shovels and spades involved in manual methods. However, safety can be a concern with handheld trenchers as well. When a handheld trencher hits a rock, the kickback can cause serious injury to the operator if their hand slips. Additionally, flying debris from the spinning blade can cause injuries if proper safety equipment is not worn.
Walk-Behind Trenchers
Walk-behind landscape trenchers make the job easier than using handheld trenchers. Instead of straining your back with a handheld trencher, walk-behind trenchers allow the operator to stand while trenching and guide the trencher as it does the work. If you choose to go this route, here’s what to look for.
Choose a trencher you feel comfortable operating. Unlike the name implies, most walk-behind trenchers require the operator to slowly walk backwards as the trencher digs, but the backward pulling movement is so slow it appears that the operator is “walking behind” the machine. If walking backward while trenching seems like a safety risk because you can’t see what’s in your way, there are other options available that maximize convenience and safety. For example, the Kwik-Trench mini-trencher from Little Beaver is a revolutionary walk-behind trencher with a simple, push forward design that makes it one of the safest, fastest and easiest to use trenchers on the market. In fact, it can reach cutting speeds of up to 30 feet per minute.
Maneuverability is also an important factor to consider with landscape trenching machines. Look for a mini-trencher with compact construction for maneuvering around obstacles like landscape settings, fences, gates and vegetation. To make the clean-up process easier, we suggest getting a mini-trencher with pneumatic tires to easily glide over grass without ripping it up. Some mini-trenchers like our Kwik-Trench are also designed to neatly deposit soil next to the trench for neat, easy backfilling.
Choosing Your Trencher
For more information about the Kwik-Trench, check out our blog on Kwik-Trench Do’s and Don’ts. Otherwise, if any additional questions come up as you’re researching mini-trenchers, don’t hesitate to contact Little Beaver or your local rental center for tips and ideas. We want your DIY project to go as smoothly as possible and are happy to offer any advice on the equipment you need to make it happen.

Last updated Mar 27, 2026
No matter the soil type where you’re digging Little Beaver has the point and blade combination to get the job done. Use the guide below to determine what is best for your area of operation.